Initialize Variable #
Creates a variable.
Choose the Engini software and click on the “Initialize variable” action:

Follow the next steps to learn how to define this activity:
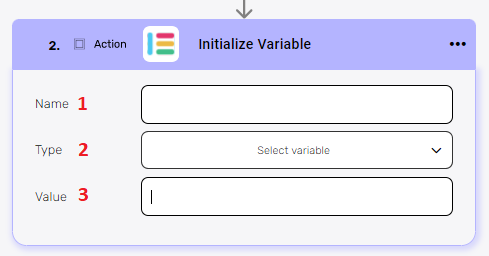
- Name
- Click on the empty field and the tooltip will pop up.
- Select from the tooltip the name of the new item you create. you can use:
- Static value – number / string. when using strings, you need to surround them with single quotes (‘).
- Property value from a previous activity (Using the tooltip that opens when clicking on the field).
- Type

Choose from the drop down list the type of variable you want to define. - Value
The value is optional. You can set it in a variable that you initialize as an initial value, but you can choose not to fill the field of the variable and populate it later in the workflow.- Option 1- Without Initial Value:
When a variable is not initialized with an initial value, the system automatically assigns a default value based on the variable type.- For a String Variable, the system assigns an empty string (
""). - For a Number Variable, the system assigns the value
0. - For a Boolean Variable, the system assigns the value
false. - For a Array Variable, the system assigns an empty list/array (
[]). - For an Object Variable, the system assigns an empty object (
{}).
- For a String Variable, the system assigns an empty string (
- Option 2- With Initial Value:
Click on the empty field to and the tooltip will popup showing all the options you can use to fill the value.
You can populate the value in one of the following options:- Static value – number / string. when using strings, you need to surround them with single quotes (‘).
- Property value from a previous activity (Using the tooltip that opens when clicking on the field).
- Expression – using functions and/or Previous activity properties and/or static values (Using the tooltip that opens when clicking on the field).
- Option 1- Without Initial Value:
Set Variable #
Updates the value stored in the variable with a new value.
Choose the Engini software and click on the “Set variable” action:

Follow the next steps to learn how to use this activity:

- Name
Choose from the drop down the name of the variable you want to set. - Value
- Click on the empty field to be shown the tooltip with all the options you can use to fill the value.
- You can populate the value in one of the following options:
- Static value – number / string. when using strings, you need to surround them with single quotes (‘).
- Property value from a previous activity (Using the tooltip that opens when clicking on the field).
- Expression – using functions and/or Previous activity properties and/or static values (Using the tooltip that opens when clicking on the field).
Append To Array Variable #
Appending to an array variable allows you to dynamically add new values to the end of the array without changing the size or structure of the array.
Choose the Engini software and click on the “Append to array variable” action:

Follow the next steps to learn how to use this activity:

- Name
Choose from the drop down the name of the variable you want to append to. - Value
- Click on the empty field to be shown the tooltip with all the values you can use to fill the value field.
- You can populate the value in one of the following options:
- Static value – number / string. when using strings, you need to surround them with single quotes (‘).
- Property value from a previous activity (Using the tooltip that opens when clicking on the field).
- Expression – using functions and/or Previous activity properties and/or static values (Using the tooltip that opens when clicking on the field).
Append to String Variable #
Appending to an string variable allows you to dynamically add new values to the end of the string without changing the size or structure of the string.
Choose the Engini software and click on the “Append to string variable” action:
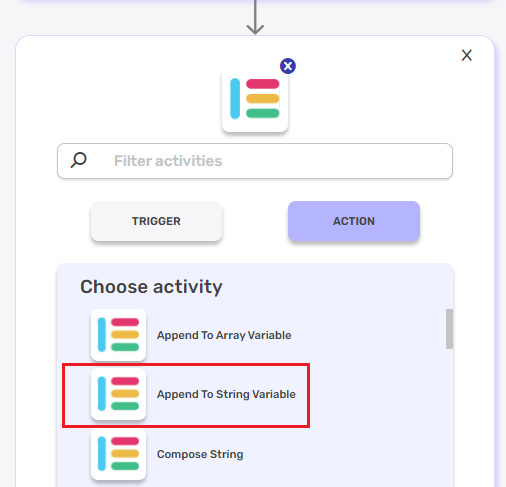
Follow the next steps to learn how to use this activity:
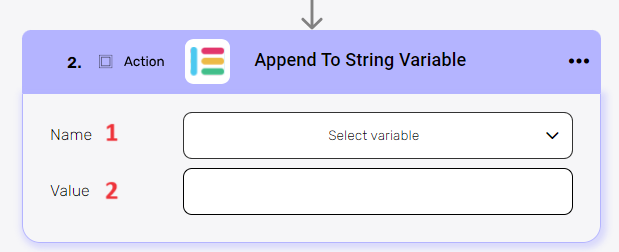
- Name
Choose from the drop down the name of the variable you want to append to. - Value
- Click on the empty field to be shown the tooltip with all the values you can use to fill the value field.
- You can populate the value in one of the following options:
- Static value – number / string. when using strings, you need to surround them with single quotes (‘).
- Property value from a previous activity (Using the tooltip that opens when clicking on the field).
- Expression – using functions and/or Previous activity properties and/or static values (Using the tooltip that opens when clicking on the field).
Increment Variable #
Increment variable refers to the operation of increasing the value of a variable by a specific amount.
Choose the Engini software and click on the “Increment Variable” action:
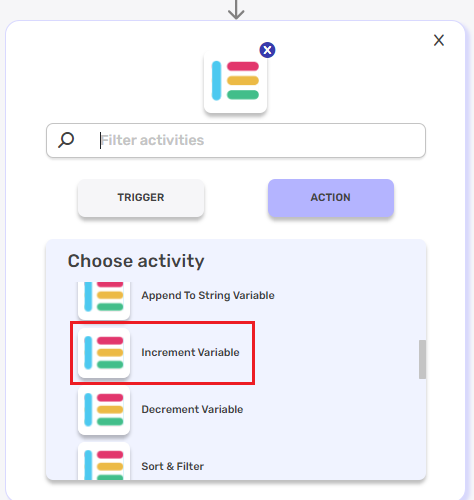
Follow the next steps to learn how to use this activity:
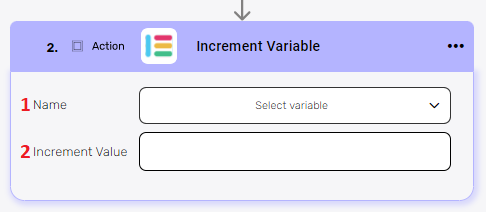
- Name
Choose from the drop down the name of the variable you want to set. - Increment Value
Click on the empty field to fill the increment number.
Decrement Variable #
Decrement variable refers to the operation of decreasing the value of a variable by a specific amount or step.
Choose the Engini software and click on the “Decrement Variable” action:
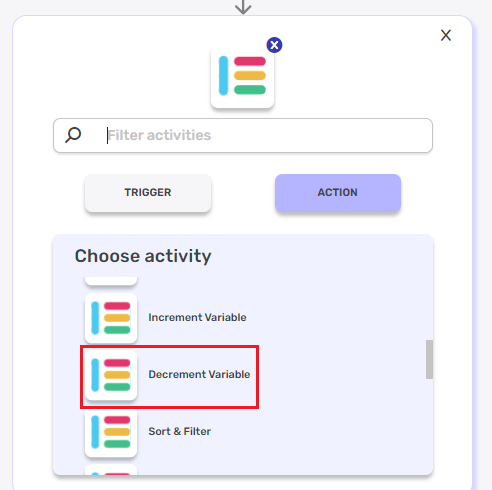
Follow the next steps to learn how to use this activity:
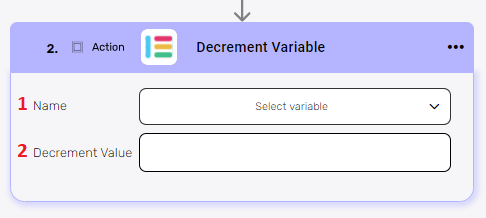
- Name
Choose from the drop down the name of the variable you want to set. - Decrement Value
Click on the empty field to fill the decrement number.
Map Array #
The map array activity allows you to transform a data list that contains multiple pieces of data into a new data list based on the properties and values you choose.
For example, let’s consider the following data list:
[
"status": "Working on it",
"date4": "2023-08-19",
"text": "052123456",
"text2": "info1@engini.io",
"checkbox": "v",
"checkbox_1": "v",
"BOARD_ID": "5017384721",
"GROUP_ID": "topics",
"ITEM_ID": "5017384726",
"name": "Meital Borenstein"
},
"status": "Done",
"date4": "2023-08-20",
"text": "052123456",
"text2": "info2@engini.io",
"checkbox": "",
"checkbox_1": "v",
"BOARD_ID": "5017384721",
"GROUP_ID": "topics",
"ITEM_ID": "5017384728",
"name": "Nimrod Tzeler"
},
"status": "Working on it",
"date4": "2023-08-17",
"text": "052123456",
"text2": "info3@engini.io",
"checkbox": "v",
"checkbox_1": "",
"BOARD_ID": "5017384721",
"GROUP_ID": "topics",
"ITEM_ID": "5017384729",
"name": "Itay Guttman"
},
"status": "Stuck",
"date4": "2023-10-10",
"text": "052123456",
"text2": "info@engini.io",
"checkbox": "",
"checkbox_1": "v",
"BOARD_ID": "052123456",
"GROUP_ID": "topics",
"ITEM_ID": "5352748005",
"name": "Michael Golnik"
},
"status": "Working on it",
"date4": "2023-10-01",
"text": "052123456",
"text2": "info4@engini.io",
"checkbox": "v",
"checkbox_1": "v",
"BOARD_ID": "5017384721",
"GROUP_ID": "topics",
"ITEM_ID": "5352749950",
"name": "Avishai Dotan"
}
]
Using the activity, we will create an array containing the names and emails of employees. To do this, select the appropriate properties and values. For this example, choose the following properties:

Applying the map array, you will get the following array:
[
{
"Name": "Meital Borenstein",
"Email": "info1@engini.io"
},
{
"Name": "Nimrod Tzeler",
"Email": "info2@engini.io"
},
{
"Name": "Itay Guttman",
"Email": "info3@engini.io"
},
{
"Name": "Michael Golnik",
"Email": "info@engini.io"
},
{
"Name": "Avishai Dotan",
"Email": "info4@engini.io"
}
]
This array contains the names and emails of the employees extracted from the original data list.


.png)