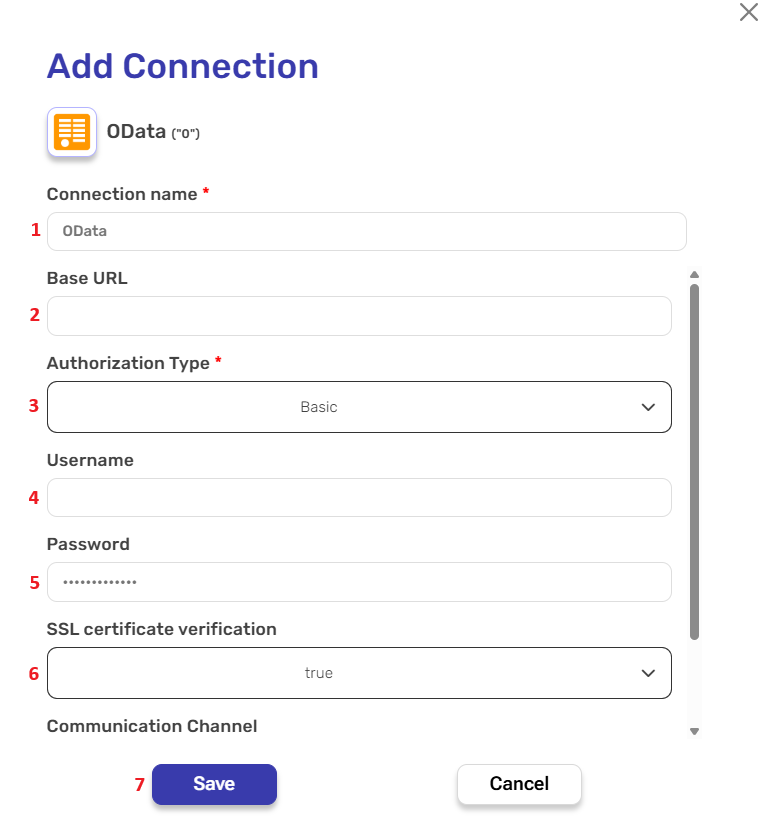
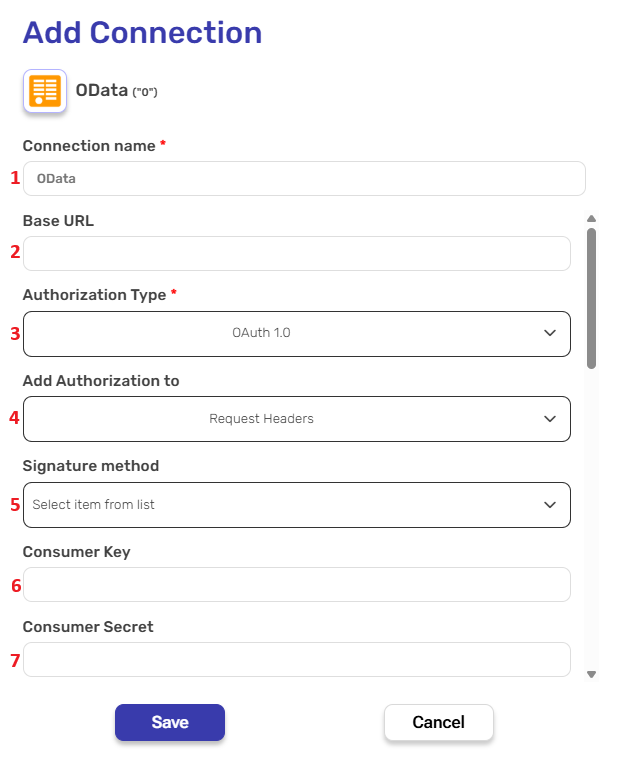
Connection name – A unique identifier for the connection within Engini.
Base URL – Enter the root URL of your OData service.
Authorization Type – Choose the method used to authenticate your connection to the OData service.
Basic – Simple authentication using a username and password. Common in internal or simpler OData services.
Username – Enter the username provided by your OData service provider.
Password – Enter the corresponding password for the username above.
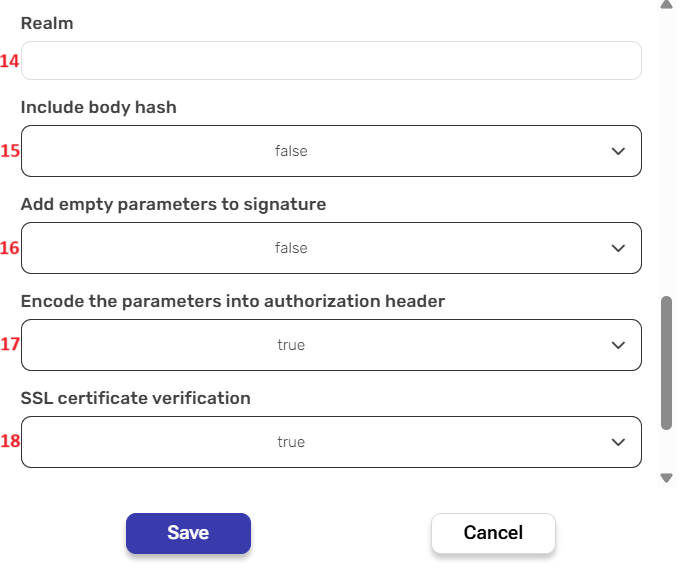
SSL Certificate Verification – Choose whether to verify the SSL certificate of the server. Set this to true to enforce secure connection validation. Use false only in trusted test environments.
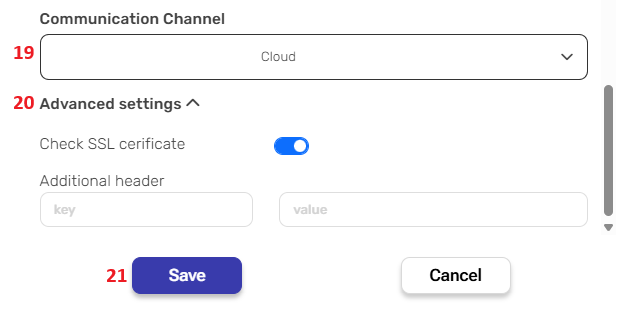
Communication Channel – Choose how Engini will communicate with your OData service:
Cloud – Default option. Use this when your OData service is accessible over the public internet.
OPA – Select this when your OData service is hosted on a private network and requires Engini’s On-Prem Agent (OPA) to establish a secure connection behind a firewall.
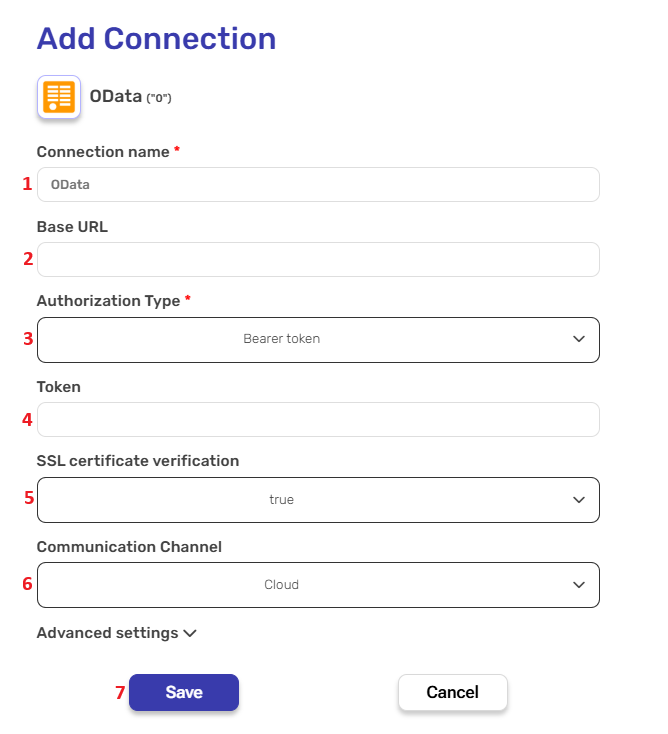
Connection name – A unique identifier for the connection within Engini.
Base URL – Enter the root URL of your OData service.
Authorization Type – Choose the method used to authenticate your connection to the OData service.
Select Bearer token from the dropdown list
Token – Paste your Bearer token here. This token is usually obtained manually from your identity provider or authorization server and is used as-is for authenticating requests.
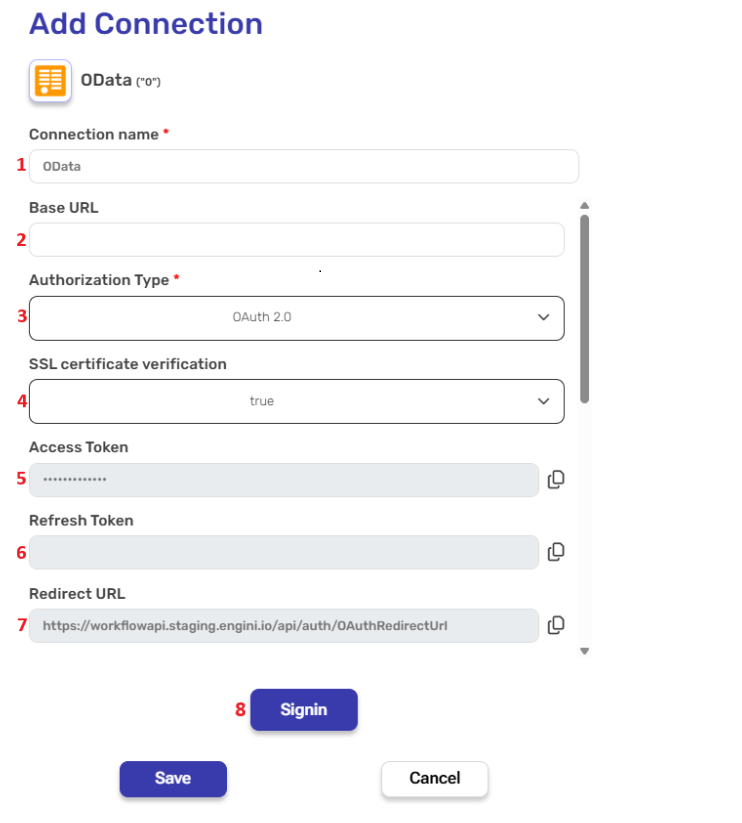
Connection name – A unique identifier for the connection within Engini.
Base URL – Provide the base OData endpoint you wish to connect to.
Authorization Type – Select OAuth 2.0 as the authorization method.
SSL Certificate Verification – Choose whether to validate the SSL certificate of the remote service
Access Token – Engini will automatically retrieve this after you click Signin (see below). No need to fill this manually.
Refresh Token – Like the access token, this is populated after successful sign-in. It is used to request a new access token when the current one expires.
Redirect URL – This is the URL the authorization server will redirect to after the user authenticates. You must register this URL with your identity provider.
Signin –Click Signin to start the OAuth authorization process. This will open a browser window for login and consent.
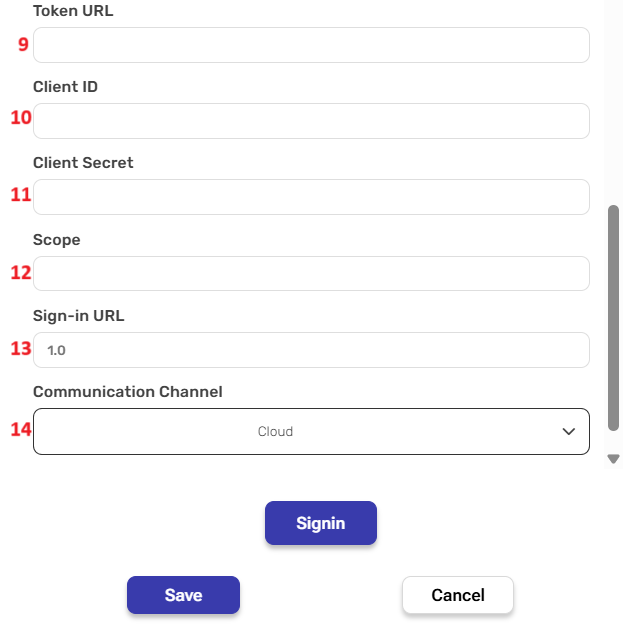
Token URL – The endpoint used to retrieve access and refresh tokens. Usually provided by your identity provider.
Client ID – The client/application ID from your identify provider.
Client Secret – The secret associated with your client ID.
Scope – Define your access scope requested from the provider.
Sign-in URL – The authorization endpoint where the user is redirected to log in and approve access.
Communication Channel – Choose how Engini will connect to the service:
Cloud – Default option, for publicly accessible OData services.
OPA – For internal/private services, using the On-Prem Agent.
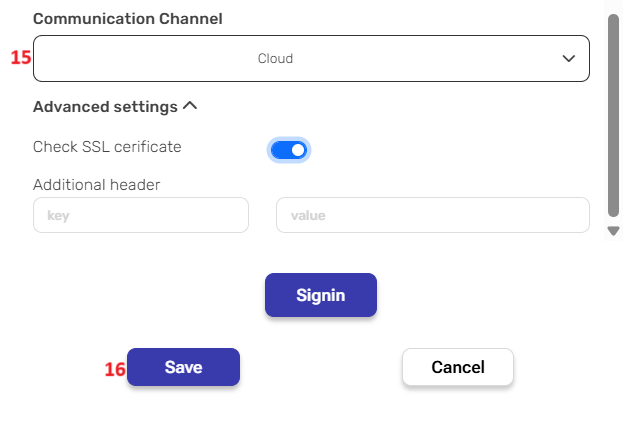
Advanced Settings
Check SSL certificate – Toggle on to verify server certificate.
Additional header – Add any extra HTTP headers required by the API
Save – After completing the sign-in, click Save to finalize the connection.
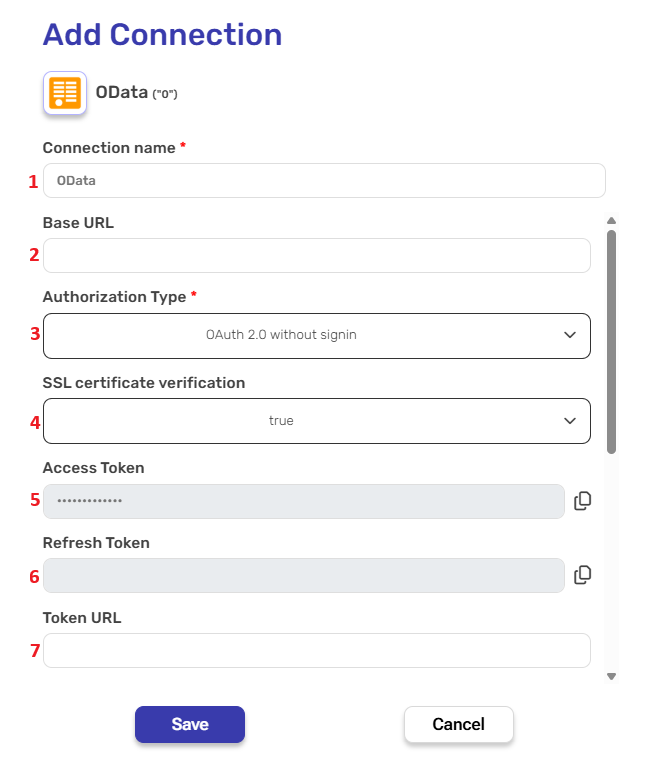
Connection name – A unique identifier for the connection within Engini.
Base URL – Provide the base OData endpoint you wish to connect to.
Authorization Type – Select OAuth 2.0 Without signin as the authorization method.
SSL Certificate Verification – Choose whether to validate the SSL certificate of the service.
Access Token – This field will be populated automatically after token retrieval via the token URL. You don’t need to fill it manually.
Refresh Token – Optional. This is typically left blank for client credentials flows, as they often use short-lived tokens without refresh capability.
Token URL – Enter the full URL of your identity provider’s token endpoint.
Client ID – The client/application ID obtained from your identity provider.
Client Secret – The associated secret used to authenticate the client.
Grant type – Defaults to client credentials. This is the only supported grant type for this flow.
Communication Channel – Choose how Engini should connect to your OData service:
Cloud – For publicly accessible APIs.
OPA – If the service is hosted on a private network and requires the Engini On-Prem Agent.
Advanced Settings
Check SSL certificate – Toggle this on to enable HTTPS certificate validation
Additional header – You can add custom HTTP headers if your identity provider or API requires them.
Save – After filling in the required fields, click Save to finalize and activate the connection.
Note: After you’ve saved the connection, you can add additional objects and actions. On the right side of the saved connection, you’ll see three dots.
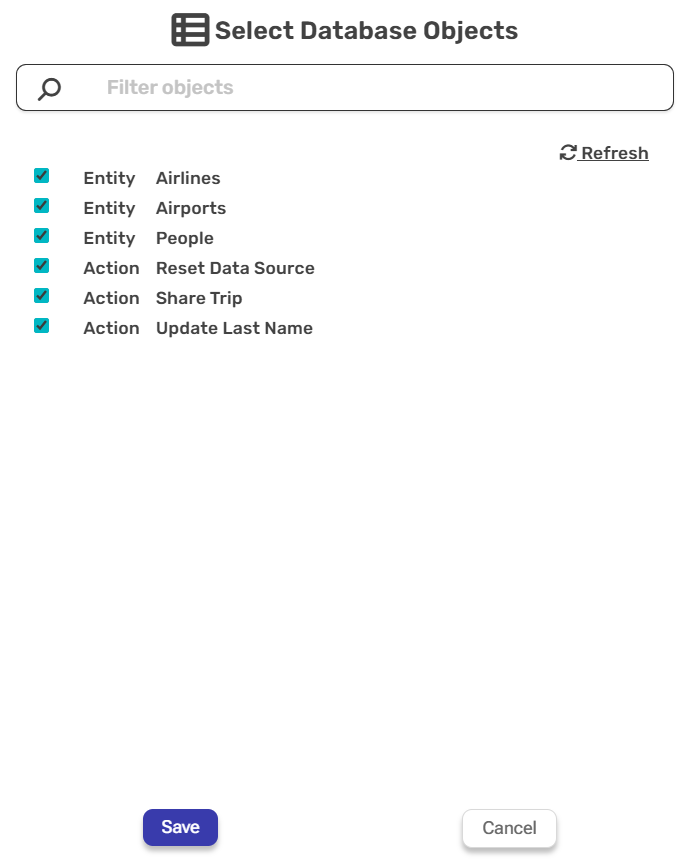
Click on the three dots and then click on “Select database objects”.
A window will open displaying all available entities and actions, just like when you saved your connection. From this window, select the new entities and actions you want to use.
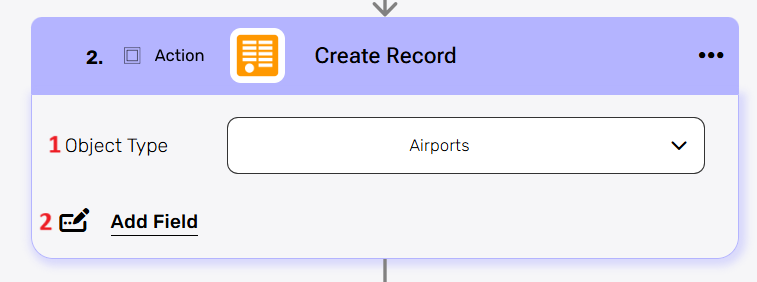
This activity adds a new record to a selected OData entity, letting you insert data like customers, orders, products, or other custom entities defined in your service.
Object Type- Select the target entity where the new record should be created. Only entities that were selected during the “Select Database Objects” step of the OData connection will appear here.
Add Fields- Select which fields to populate in the new record and provide their values:
Click the empty field to the right of the dropdown to view a tooltip displaying all the available options for filling in the field.
You can populate the field in one of the following options:
Static value – number / string. when using strings, you need to surround them with single quotes (‘).
Property value from a previous activity (Using the tooltip that opens when clicking on the field).
Expression – using functions and/or Previous activity properties and/or static values (Using the tooltip that opens when clicking on the field).
Repeat steps 1-3 for all the fields you want to populate.
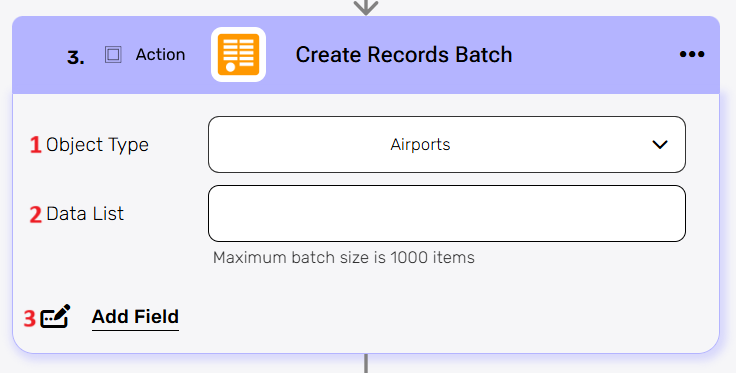
This activity allows you to create multiple records for a specified OData entity in a single request.
Object Type- This field defines the target entity for all records in the batch. Its options are limited to the entities you previously chose in the “Select Database Objects” configuration for your OData connection.
Date List- Provide an array of objects, where each object represents a record to be created. Each object in the array must contain the same structure, mapping the appropriate fields. Note: Maximum batch size is 1000 records per request
Add Field- Define which fields will be populated in each record.
Click the empty field to the right of the dropdown to view a tooltip displaying all the available options for filling in the field.
You can populate the field in one of the following options:
Static value – number / string. when using strings, you need to surround them with single quotes (‘).
Property value from a previous activity (Using the tooltip that opens when clicking on the field).
Expression – using functions and/or Previous activity properties and/or static values (Using the tooltip that opens when clicking on the field).
Repeat steps 1-3 for all the fields you want to populate.
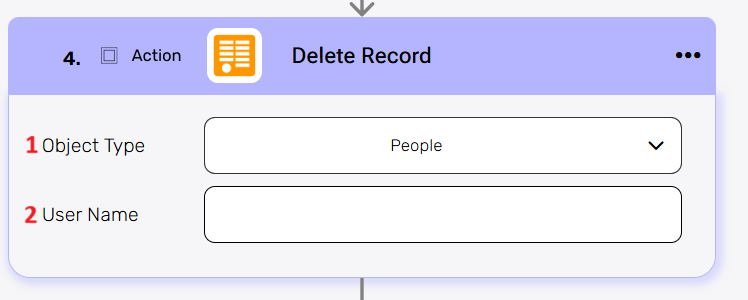
This activity allows you to delete a specific record from an OData entity. It’s used for removing existing data (e.g., an old customer entry, a canceled order).
Object Type- Select the entity from which you want to delete a record. Only entities selected during the “Select Database Objects” step of your OData connection will appear here.
User Name- Enter the value of the mandatory field used to identify the record to delete. In the example shown, user name is the identifier for the people entity.
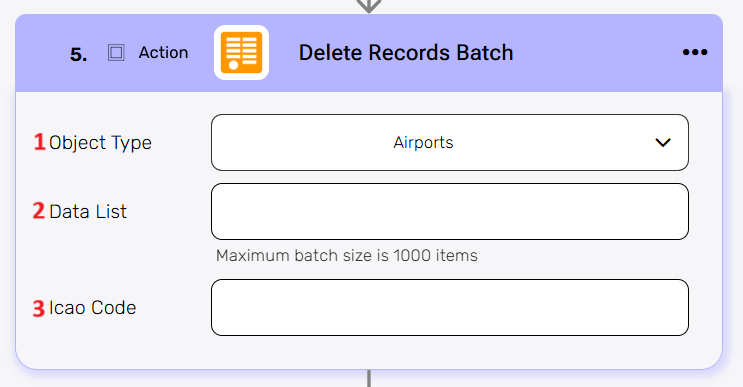
This activity enables you to delete multiple records from a specified OData entity in a single batch request, enhancing efficiency when removing a large number of entries.
Object Type- Select the entity from which you want to delete a record. Only entities selected during the “Select Database Objects” step of your OData connection will appear here.
Data List- Provide an array of objects, where each object represents a record to delete. Maximum batch size is 1000 items per request.
Icao Code- Enter the value of a mandatory field used to identify the record to be deleted. In the example shown, the Icao code is the primary identifier for the Airports entity.
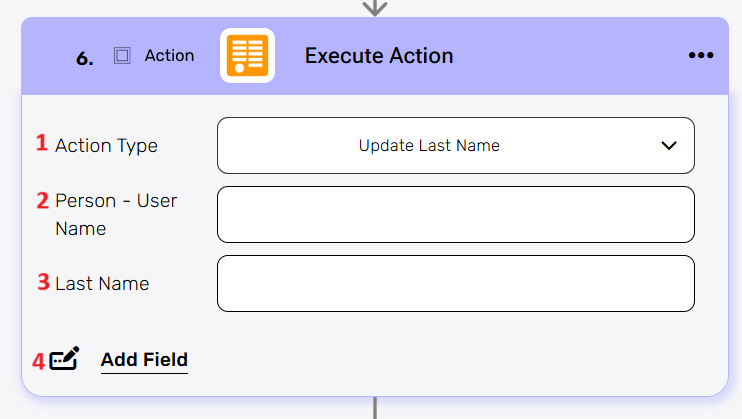
This activity allows you to execute custom actions defined within your OData service. This is useful for triggering specific business logic or processes exposed by the OData service (e.g., “Reset Data Source”, “Share Trip”, “Update Last Name” as seen in the “Select Database Objects” image).
Action Type- This field selects the specific OData action to be executed. Its options are limited to the actions you previously chose in the “Select Database Objects” configuration for your OData connection.
Person-User Name – A mandatory field needed to execute the action.
Last Name – A mandatory field needed to execute the action. Note: Mandatory fields can vary depending on the action being performed. In this case, the action is “Update Last Name“, and these two fields are required to complete it.
Add Field– Define which fields will be populated in each record.
Click on the empty field to the right of the drop down to be shown the tooltip with all the options you can use to fill the field.
You can populate the field in one of the following options:
Static value – number / string. when using strings, you need to surround them with single quotes (‘).
Property value from a previous activity (Using the tooltip that opens when clicking on the field).
Expression – using functions and/or Previous activity properties and/or static values (Using the tooltip that opens when clicking on the field).
Repeat steps 1-3 for all the fields you want to populate.
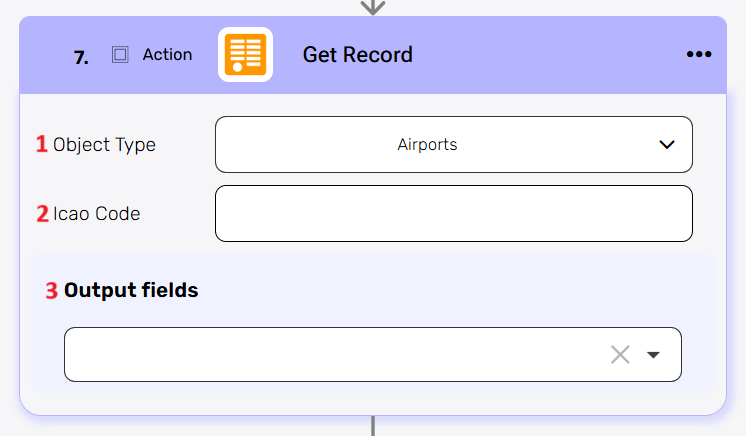
This activity retrieves a single record from a specified OData entity based on its unique identifier. It’s used for fetching specific data when you know the exact record you need.
Object Type– Select the target entity from which a single record will be retrieved. Its options are limited to the entities you previously chose in the “Select Database Objects” configuration for your OData connection.
Icao Code– Provide the required value to identify the record to retrieve. In this example, the Icao Code is the mandatory field for the Airports entity.
Output Fields- Select one or multiple fields to include in the output. These are the fields whose values will be available in downstream steps. You can choose only the fields relevant to your use case to optimize performance and clarity.
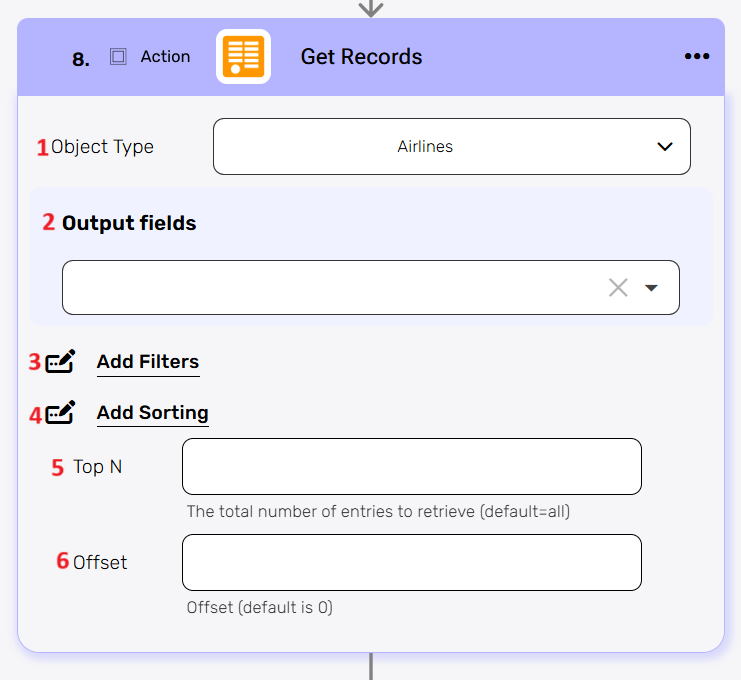
This activity retrieves multiple records from a specified OData entity, supporting advanced queries like filtering, sorting, limiting results, and pagination for precise data retrieval.
Object Type– This field selects the target entity from which multiple records will be retrieved. Its options are limited to the entities you previously chose in the “Select Database Objects” configuration for your OData connection.
Output Fields- Select one or multiple fields to include in the output. These are the fields whose values will be available in downstream steps. You can choose only the fields relevant to your use case to optimize performance and clarity.
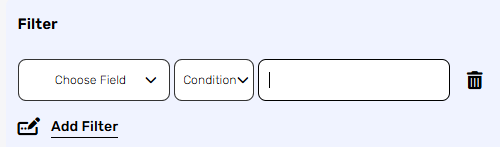
Add Filters- You can specify which records will be returned from the search results by utilizing the “Add Filter” button.
Choose from the drop down the field you want to filter by.
Select the condition you want the records to meet for the selected field.
Click on the field to show the tooltip with all the options you can choose.
You can populate the field in one of the following options:
Static value – number / string. when using strings, you need to surround them with single quotes (‘).
Property value from a previous activity (Using the tooltip that opens when clicking on the field).
Expression – using functions and/or Previous activity properties and/or static values (Using the tooltip that opens when clicking on the field).
Repeat steps 1-3 for all the fields you want to populate.
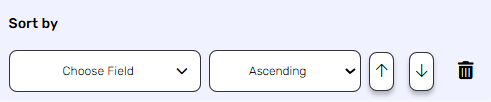
Add Sorting- Specify how the retrieved records should be ordered. You can sort in ascending or descending order.
Click on the “add sorting” button.
Choose from the drop down the field you want to sort by.
Choose the sorting option: descending or ascending.
You can do a multi sort by choosing to sort more than one field. Use the arrows on the right to select the field that will be used as the primary sort, secondary, etc.
Top N-You can specify how many records with the same value you want to get. Click on ‘Top N’ and enter the maximum number of values you want to retrieve. For example – If you set Top N = 1, a single record will be returned instead of an array. If no record is found, the action will fail, allowing you to implement an IF condition within the workflow. This can be useful for processes where the existence of a record determines the next steps in the workflow.
Offset-This field specifies the number of records to skip from the beginning of the result set before retrieving the rest. It is commonly used for pagination in conjunction with Top N. For example -If you set Offset = 2 and Top N = 3, three records will be returned starting from the second record will be returned. If no record is found, the action will fail, allowing you to implement an IF condition within the workflow. This can be useful for processes where the existence of a record determines the next steps in the workflow.
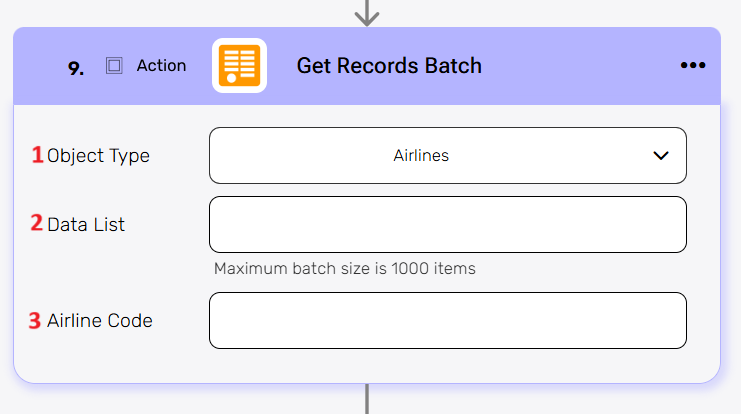
This activity allows you to retrieve multiple specific records from an OData entity in a single batch request. Unlike “Get Records” which queries based on filters, this action fetches records based on a provided list of unique identifiers, making it efficient for retrieving known sets of records in bulk.
Object Type– This field selects the target entity from which records will be retrieved in batch. Its options are limited to the entities you previously chose in the “Select Database Objects” configuration for your OData connection.
Data List- This field accepts an array of objects, where each object typically contains the unique identifier of a record to be retrieved.
Icao Code- Specify the icao code field that Engini should use to match and retrieve each record in the batch. In this example, Icao Code is the mandatory field of the Airports entity.
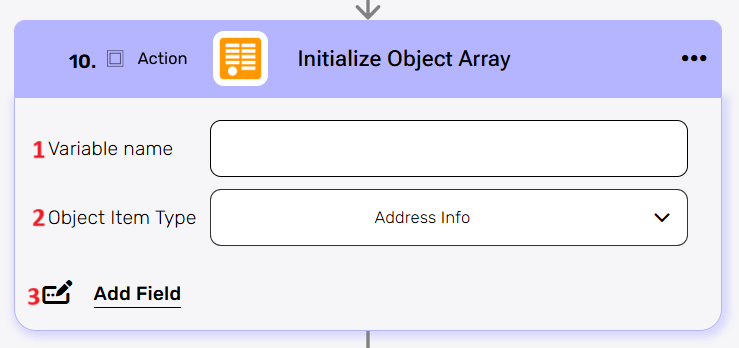
This activity initializes a new, empty object array and assigns it to a specified variable. It’s typically used at the beginning of a process where you intend to collect multiple objects (e.g., OData records) into a single array for later processing, such as batch operations or data manipulation.
Variable name – This field defines the name of the new variable that will store the object array.
Object Item Type – This field specifies the expected structure or schema of the individual objects that will be stored within the array. Select the type of object that this variable will contain. This determines the structure and available fields for each item in the list.
Add Fields– By clicking the “Add field” button, you can choose how to fill in the fields for the array. You can add one field to the activity or more fields to the activity definitions, up to the number of fields you have in the selected object. The fields vary depending on the selected object.
Click on the empty field to the right of the drop down to be shown the tooltip with all the options you can use to fill the field.
You can populate the field in one of the following options:
Static value – number / string. when using strings, you need to surround them with single quotes (‘).
Property value from a previous activity (Using the tooltip that opens when clicking on the field).
Expression – using functions and/or Previous activity properties and/or static values (Using the tooltip that opens when clicking on the field).
Repeat steps 1-3 for all the fields you want to populate.
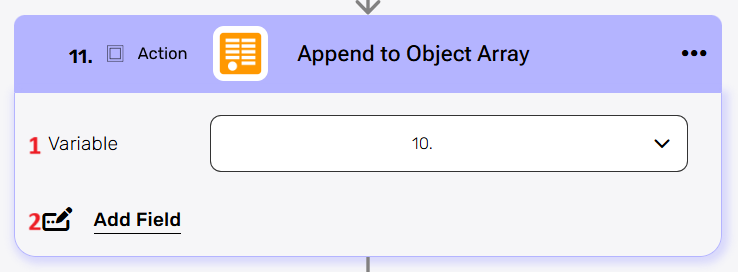
This action adds a new object to an existing object array variable that was initialized earlier in the workflow.
Variable – Select the array you initialized in the previous steps. After selecting the variable, the “Add Field” option becomes available.
Add Field– By clicking the “Add field” button, you can choose how to fill in the various fields in the records you are creating. You can add one field to the activity or more fields to the activity definitions, up to the number of fields you have in the selected object. The fields vary depending on the selected object. Choose from the drop down the field you want to fill.
Click on the empty field to the right of the drop down to be shown the tooltip with all the options you can use to fill the field.
You can populate the field in one of the following options:
Static value – number / string. when using strings, you need to surround them with single quotes (‘).
Property value from a previous activity (Using the tooltip that opens when clicking on the field).
Expression – using functions and/or Previous activity properties and/or static values (Using the tooltip that opens when clicking on the field).
Repeat steps 1-3 for all the fields you want to populate.
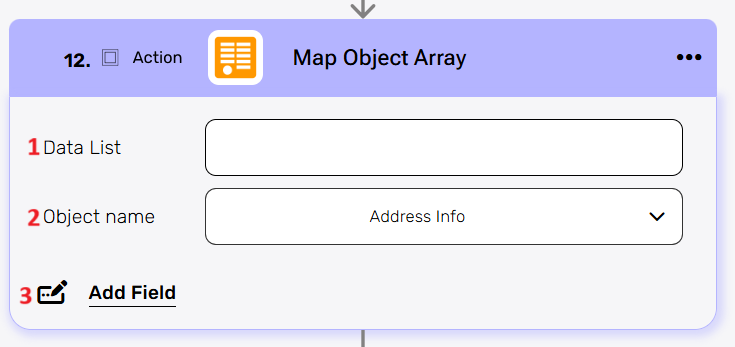
This action transforms a list of objects (an array) from one structure to another. It’s especially useful when you retrieve data from OData in one format and need to convert it to a different structure for use in subsequent actions or to send to another system.
Data List – This field specifies the input array of objects that you wish to transform.
Object name – Select the type of object that each item in the list represents. This defines the structure and available fields for each item during the mapping process.
Add Fields- By clicking the “Add field” button, you can choose how to fill in the various fields in the object you are mapping. You can add one field to the activity or more fields to the activity definitions, up to the number of fields you have in the selected object. The fields vary depending on the selected object.
Click Add Field to insert a new mapping row.
In the dropdown, choose the field in the OData entity.
In the adjacent input, provide the expression or reference for the value.
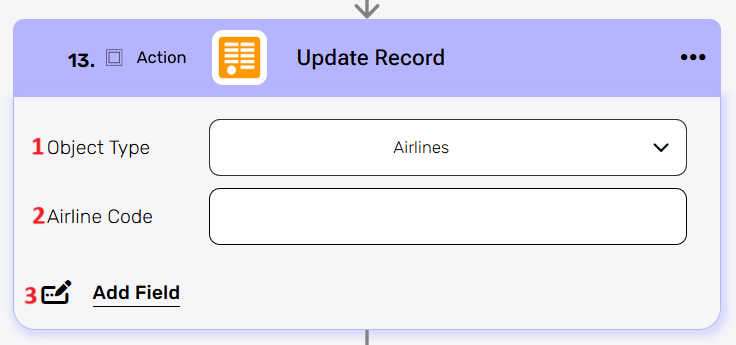
This action modifies an existing record within a specified OData entity. It’s used for changing specific fields of an existing data entry (e.g., updating a customer’s address, changing an order status).
Object Type– This field selects the target entity where an existing record will be updated. Its options are limited to the entities you previously chose in the “Select Database Objects” configuration for your OData connection.
Primary Key Field (e.g., Icao Code)- Enter the value of the primary key that uniquely identifies the record update. In this example, Icao code is the mandatory field for the Airports entity.
Add Fields- Define the fields you want to update and their new values.
Click Add Field to add a new field-value pair.
In the Choose Field dropdown, select the column to update.
In the adjacent input, provide the new value or expression.
Repeat for each field you wish to modify.
Click the trash icon to remove any unnecessary fields.
This action allows you to modify multiple existing records within a specified OData entity in a single batch request. This is highly efficient for performing bulk updates to your data.
Object Type- This field selects the target entity where all records in the batch will be updated. Its options are limited to the entities you previously chose in the “Select Database Objects” configuration for your OData connection.
Data List-This field accepts an array of objects, where each object represents a record to be updated. Each object must include the unique identifier (key) of the record to be updated, along with the properties and their new values.
Mandatory Field (e.g., Icao Code): Enter the value of the primary field that uniquely identifies the record update. In this example, Icao code is the mandatory for the Airports entity.
Add Field- Define the fields you want to update and their new values.
Click Add Field to add a new field-value pair.
In the Choose Field dropdown, select the column to update.
In the adjacent input, provide the new value or expression.
Repeat for each field you wish to modify.
Click the trash icon to remove any unnecessary fields.


.png)