Create business rules that let you control how your application behaves in response to specific events.
Discover the power of Business Rules to make your app dynamic by following several steps.
Step 1: Build your rule #
Create business rule
 #
#
- Press the “Business rule” section located at the right side of the screen.
- Click on the “Create rule” button.
Name your business rule #
By default, each new rule is assigned the name “new busniess rule”.
This can be altered via a few simple steps:
- Click the “new business rule” phrase located in the top left of the page.
- Remove the current name and enter the new name.
- Save the rule.
Choose a trigger #
- In the displayed “Choose Active Block” section, select the “Apps” software that you want to use as your trigger. You can also filter the trigger tasks directly.

- Choose the trigger activity from the available options.

- Fill in the requested fields.
When selecting any trigger action (excluding barcode), it provides access to three groups of objects: parent screen values, new values, and old values.
These values are the ones you can use in subsequent actions as you can see in the image below:
Now, let’s redirect our attention to delve into a variety of potential triggers for the app:
On field value changed
 #
#
- Click on the empty field “Choose Field”. A tooltip will popup showing the fields you’ve defined in your Screen Properties.
- Choose the field you want from this list, initiating the trigger’s activation upon any change to the chosen field’s value.
On barcode input #

This trigger allows your app to react to barcode input events.
On record creation #

This trigger activates when a new record is added to the specified table.
On record changed #

This trigger activates when a record is modified or updated within the app.
On record delete #

This trigger activates when a record is deleted within the app.
On add record clicked #

This trigger activated when a user clicks the “Add Record” button  to create a new entry.
On screen load #

This trigger represents a specific event that occurs when a user loads a particular screen or page within the application.
On button clicked #

1. Click on the empty field labeled “Choose button”. A tooltip will appear, displaying the button you’ve defined in your properties.
2. Select the wanted button from this list, initiating the trigger’s activation upon any button clicked happened.
On dropdown clicked #

When this trigger is activated, it signifies that the user has interacted with a dropdown field on the screen. In response to this interaction, you have the opportunity to define specific actions.
iFrame Event #

The iFrame Event trigger is designed to listen for specific events triggered within an iFrame and initiate workflows accordingly.
An iFrame is a frame embedded in a webpage that displays content from another website.
This trigger allows Engini to respond dynamically to user actions within the embedded content, such as form submissions and button clicks.
Add an Action #
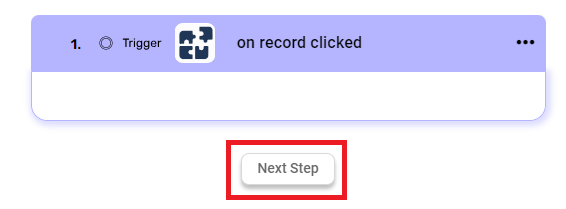
- Click on the “Next step” button to add an activity block.

- Select the software you want to use for your action. For example: Select Engini software.

- choose the activity from the available options.

- Fill in the requested fields.
Now, let’s shift our focus to explore a selection of potential App’s actions:
Sort and Filter records #
The action enables you to arrange records based on specific criteria (sorting), narrow down the displayed records based on defined conditions (filtering).
- Add Sorting

- Click on the “Add sorting” button.
- Choose from the drop down the field you want to sort by.
- Choose the sorting option: descending or ascending.
You can define a multi sort by adding more than one field to the sort. Use the arrows on the right to define the sort order – which field will be used as the primary sort, secondary, etc.
- Add Filter

- Click on the “Add filters” button.
- Choose from the drop down the item you want to filter by.
- Select the condition you want the records to meet for the selected field.
- Click on the rightest field to show the tooltip with all the options you can choose. You can populate the field in one of the following options:
- Static value – number / string. when using strings, you need to surround them with single quotes (‘).
- Property value from a previous activity (Using the tooltip that opens when clicking on the field).
- Expression – using functions and/or Previous activity properties and/or static values (Using the tooltip that opens when clicking on the field).
- Top N
In this field you can define the maximum number of values you want to retrieve. For example, by entering the value 1, the activity will return only the first record that meets the conditions setup (if filtering is defined).
Open Form #
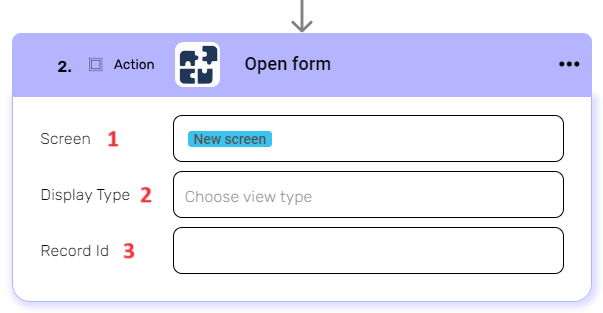
The action enables you to display a specific form or interface (screen) in a designated manner (display type) using the provided record identifier (record ID) for contextual access and interaction.
- Screen
Select the desired screen (defaulting to the current screen associated with the business rules) that you want to display or interact with when using this action. - Display Type
Choose how you want the screen to be presented: either as a preview, or as a detailed view (this choice is influenced by the app’s initial settings and design preferences set during the app development phase). - Record Id
Select the unique identifier associated with the relevant record from previous activities, enabling interaction or display focused on the selected screen and display type. The identifiers of records in Engini tables are called “record id”.
Dropdown Data #
This action allows you to create a dropdown menu within your application interface, providing users with a selection of options to choose from.
- Data List
Here, you define the set of options that will be presented in the dropdown menu. You input the list of data elements, and these will be displayed as selectable choices for the users. - Display
Determines what will be visible to the users in the dropdown menu. - Value
Underlying data associated with each option. When a user selects an option from the dropdown, the corresponding value is captured.
Set Focus #
Directs a user’s attention to a particular input field within the application interface. It visually indicating that the user should interact with that specific field.
Select the input field that you want to bring into focus.
Display error message #

Displays error messages to users. When triggered, it presents a message dialog on the screen.
The “Title” is the header of the dialog.
“Message” contains the detailed information.
Users can dismiss the dialog using the “Close Button“. By default the button will display OK and this can be changed to suit your needs.
Display warning message #

Alerts users with warning notices. It presents a message dialog with customizable elements.
“Title” serves as the dialog header.
The “Message” contains detailed information.
Users have the option to respond using two buttons:
“Cancel Button” (for canceling) and
“OK Button” (for confirming). The button display label can be changed to suit your needs.
You can define different actions to be executed depending on the user response to the warning message.
For more information about Engini’s activities, go to Flow control and Workflow editor.
Add record #

- Click on the “Add field” button.
- Choose from the drop down the field you want to add.
- Enter a value for the field.
Update record #

- Click on the “Add field” button.
- Choose from the drop down the field you want to update.
- Enter a value for the field.
Display iFrame #

Displays an external web page within an embedded frame.
- Title
Defines the title of the iFrame dialog. - Source URL
The web address (URL) of the page to be displayed. - Referrer Policy
Determines how the browser handles referrer information when loading the iFrame. - Fields
- Origin
Specifies the source domain from which content is loaded. - Message Listener-
Allows communication between Engini and the embedded content.
- Origin
Close iFrame #

The “Close iFrame” action used to close the previously displayed iFrame.
- It hides or removes the iFrame from the screen within Engini.
Closing the iFrame can be triggered manually or automatically as part of a workflow. - Close Status Field
- This field can store the closure status, which may be useful for continuing the process.
Refresh Screen #
This action ensures that the main screen reflects the most up-to-date data after changes are made in a sub-screen.
For example, when a user modifies information in a sub-screen (such as editing an item within an order), the updated data is saved to the relevant table.
However, if the change also affects the parent record (e.g., updating an order total based on a modified item), the parent screen is not automatically refreshed. As a result, when the user returns to the main screen, the updated values may not be visible.
Therefore, after updating the parent table with the necessary changes, the “Refresh Screen” action should be applied to ensure the main screen displays the latest data.

Screen – Select the name of the screen you want to refresh.
Step 2: Activate your rule #
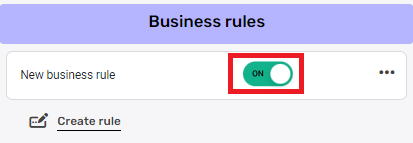
Your rule is almost ready to go! Engini’s rules are enabled by default.
Make sure the on/off switch is activated.

For Editing, Duplicating or Deleting your business rule:
- Click on the three dots •••
- Select the action you wish to execute.
Step 3: Test your business rule #
It’s time to test your business rule to ensure that all components are functioning correctly.
To ensure they’re working as expected, follow these steps to test them thoroughly:
- Navigate to the Demo App, as seen below

- Trigger the Business Rule Workflow
Identify the action or event that you’ve configured as the trigger for your Business Rule. This could be a button click, a value change, or any other user interaction that initiates the workflow.
Perform the action that corresponds to the trigger.
For example, if your trigger is “On Status Change,” update the status of a record to the desired value.
As you perform the trigger action, the Business Rule workflow will be automatically initiated in the background. - Observe the Expected Outcome
Once the Business Rule workflow is initiated, observe the outcome of the action that you wanted the workflow to perform. This could involve data updates, status changes, sending notifications, etc.
Verify whether the action has been carried out exactly as you defined in the Business Rule. - Check Run History
After triggering the Business Rule, navigate to the “Run History” section located at the right top of the page. This is where you can view the history of Business Rule executions.
Look for the recent execution corresponding to the action you triggered. Each execution entry will provide detailed information about what occurred during that particular run. - Review Execution Details
Open the execution entry to access detailed information about the Business Rule’s execution.
Examine the execution logs, status updates, and any other relevant information to understand how the workflow progressed.
If everything went as planned, you’ll see a clear record of the steps taken by the Business Rule. If there were any errors or unexpected behavior, this log will help you diagnose the issue. - Troubleshoot Issues (If Necessary)
If the Business Rule didn’t execute as expected, carefully review the execution details to identify where the issue occurred.
Check for any error messages, unexpected conditions, or missing data that could have impacted the workflow’s behavior.
Use the information from the logs to make adjustments to your Business Rule configuration. - Iterate and Refine
If adjustments are required, return to the Business Rule configuration and make the necessary changes based on your findings.
Repeat the testing process by triggering the workflow again, and monitor the run history to ensure the adjustments have resolved the issue. - Final Verification
Continue testing the Business Rule in various scenarios to ensure it works consistently across different situations.
Verify that the Business Rule reliably automates the desired actions without errors.
Important:
Testing is an iterative process, and refining your Business Rules based on the results will help you create a robust and efficient application workflow.
For more information about workflow’s test, referring to our detailed guide Workflow Run History


.png)