Learn how to connect Engini to Hibob.
Using Engini’s Hibob activities, you can get all open tasks, the list of employees’ employment history, a list of work history for a list of employees, company employee fields, and mark a task as complete.
To get started, create an account on HiBob.
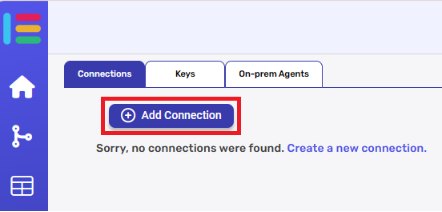
Add a connection to Hibob in Engini #
- Enter your Engini account at https://app.engini.io.
- Navigate to Connections page by clicking on the Connections on the left sidebar or by clicking here.
- Click on the Add connection option located at the topbar.
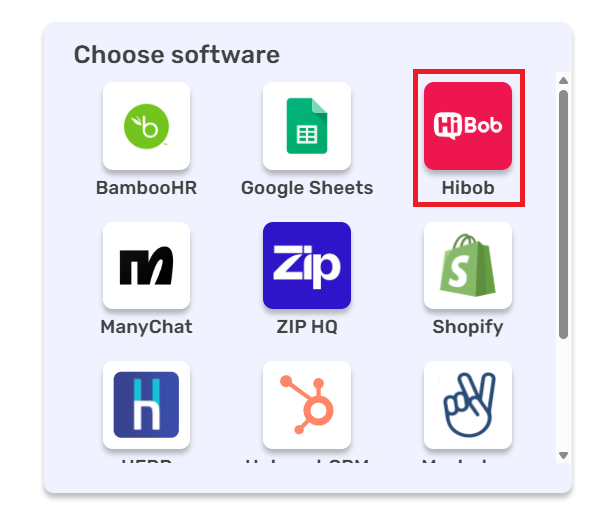
- Choose “Hibob” option from available applications.
- Enter the following details in the “Add Connection” form:
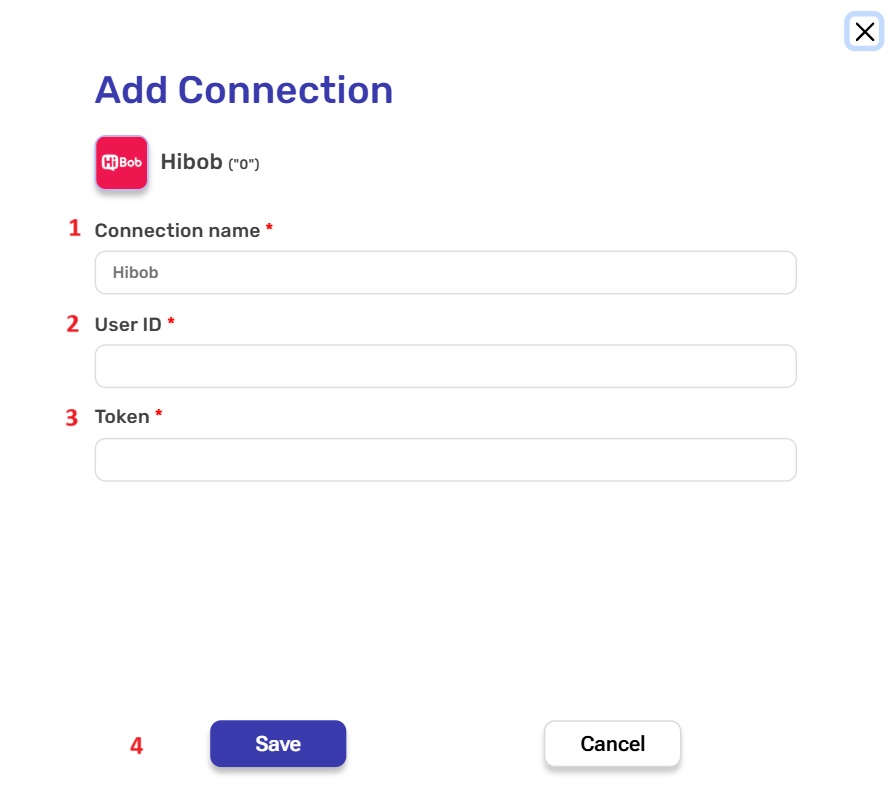
- Connection name– A unique identifier for the connection within Engini.
- User ID– This is the unique ID for the service user you create in your HiBob account for API access.
- Token– Enter the secret authentication token associated with the User ID.
- After signing in, click on the Save button to save the connection.
Triggers #
Webhooks Employee #
This trigger starts a workflow when a specific employee event occurs in HiBob.
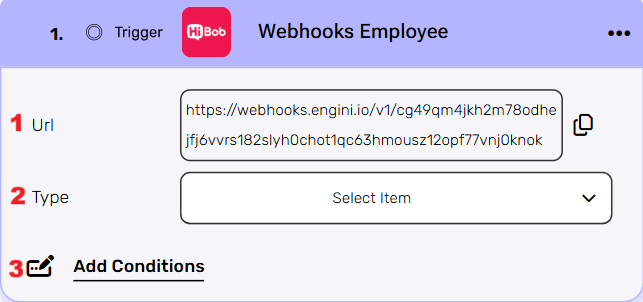
- URL – This is an automatic webhook URL generated by Engini. This URL cannot be edited or modified. Use the copy icon on the right to copy the URL and paste it into your HiBob webhook configuration.
- Type-Use the type field to select the employee event you want to listen for (e.g. employee created)
- Add Conditions -Set criteria that must be met before the workflow runs.
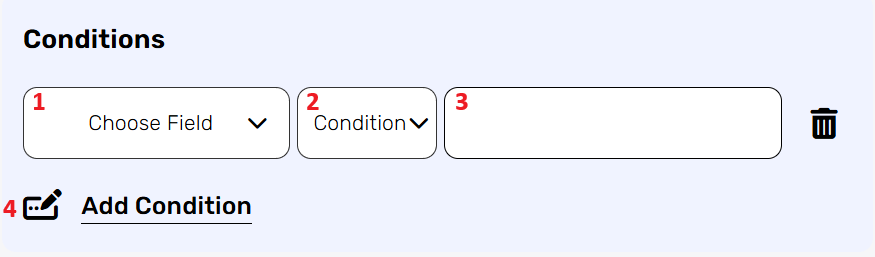
By choosing to add a condition, the workflow will only work if the condition or the number of conditions you added are met. Follow the next steps to add conditions:
- Select from the drop down the field you want to add the condition on.
- Select the condition you want to meet.
- Click on the empty field and the tooltip will pop up showing the options you can choose.
- You can populate the field in one of the following options:
- Static value – number / string. when using strings, you need to surround them with single quotes (‘).
- Property value from a previous activity (Using the tooltip that opens when clicking on the field).
- Expression – using functions and/or Previous activity properties and/or static values (Using the tooltip that opens when clicking on the field).
- You can populate the field in one of the following options:
- Repeat steps 1-3 for all the fields.
Webhooks Docs #
This trigger starts a workflow when a specific docs event occurs in HiBob.
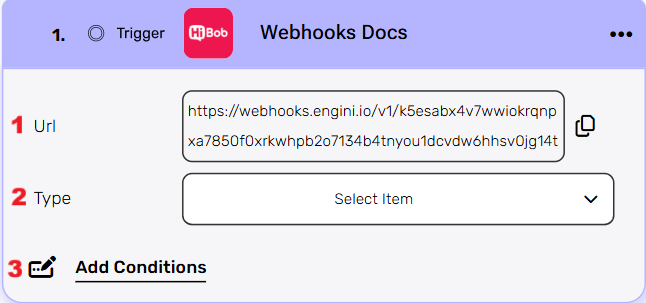
- URL – This is an automatic webhook URL generated by Engini. This URL cannot be edited or modified. Use the copy icon on the right to copy the URL and paste it into your HiBob webhook configuration.
- Type-Use the type field to select the docs event you want to listen for (e.g. eSign Document Signing Complete)
- Add Conditions -Set criteria that must be met before the workflow runs.
By choosing to add a condition, the workflow will only work if the condition or the number of conditions you added are met. Follow the next steps to add conditions:
- Select from the drop down the field you want to add the condition on.
- Select the condition you want to meet.
- Click on the empty field and the tooltip will pop up showing the options you can choose.
- You can populate the field in one of the following options:
- Static value – number / string. when using strings, you need to surround them with single quotes (‘).
- Property value from a previous activity (Using the tooltip that opens when clicking on the field).
- Expression – using functions and/or Previous activity properties and/or static values (Using the tooltip that opens when clicking on the field).
- You can populate the field in one of the following options:
- Repeat steps 1-3 for all the fields.
Webhooks Task #
This trigger starts a workflow when a specific task event occurs in HiBob.
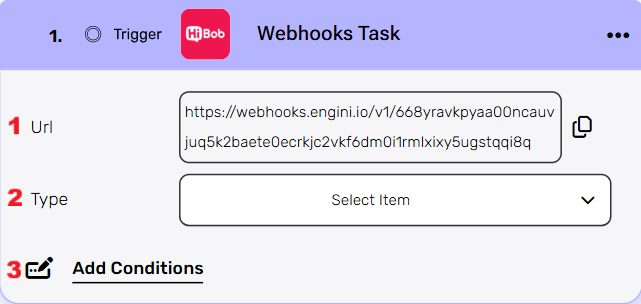
- URL – This is an automatic webhook URL generated by Engini. This URL cannot be edited or modified. Use the copy icon on the right to copy the URL and paste it into your HiBob webhook configuration.
- Type-Use the type field to select the docs event you want to listen for (e.g. Task status changed)
- Add Conditions -Set criteria that must be met before the workflow runs.
By choosing to add a condition, the workflow will only work if the condition or the number of conditions you added are met. Follow the next steps to add conditions:
- Select from the drop down the field you want to add the condition on.
- Select the condition you want to meet.
- Click on the empty field and the tooltip will pop up showing the options you can choose.
- You can populate the field in one of the following options:
- Static value – number / string. when using strings, you need to surround them with single quotes (‘).
- Property value from a previous activity (Using the tooltip that opens when clicking on the field).
- Expression – using functions and/or Previous activity properties and/or static values (Using the tooltip that opens when clicking on the field).
- You can populate the field in one of the following options:
- Repeat steps 1-3 for all the fields.
Webhooks Time-off #
This trigger starts a workflow when a specific time-off event occurs in HiBob.
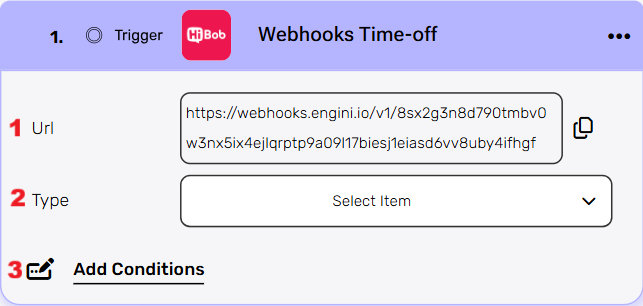
- URL – This is an automatic webhook URL generated by Engini. This URL cannot be edited or modified. Use the copy icon on the right to copy the URL and paste it into your HiBob webhook configuration.
- Type-Use the type field to select the docs event you want to listen for (e.g. Time-off Request Approved)
- Add Conditions -Set criteria that must be met before the workflow runs.
By choosing to add a condition, the workflow will only work if the condition or the number of conditions you added are met. Follow the next steps to add conditions:
- Select from the drop down the field you want to add the condition on.
- Select the condition you want to meet.
- Click on the empty field and the tooltip will pop up showing the options you can choose.
- You can populate the field in one of the following options:
- Static value – number / string. when using strings, you need to surround them with single quotes (‘).
- Property value from a previous activity (Using the tooltip that opens when clicking on the field).
- Expression – using functions and/or Previous activity properties and/or static values (Using the tooltip that opens when clicking on the field).
- You can populate the field in one of the following options:
- Repeat steps 1-3 for all the fields.
Webhooks Workforce Planning #
This trigger starts a workflow when a specific workforce planning event occurs in HiBob.
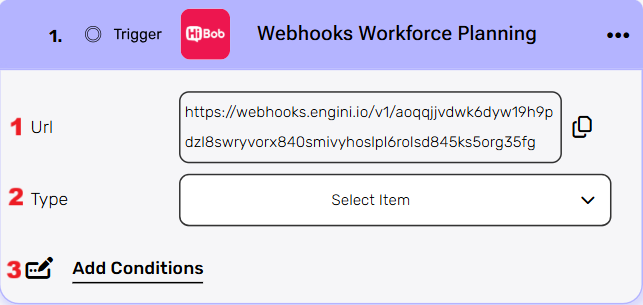
- URL – This is an automatic webhook URL generated by Engini. This URL cannot be edited or modified. Use the copy icon on the right to copy the URL and paste it into your HiBob webhook configuration.
- Type-Use the type field to select the docs event you want to listen for (e.g.
Position Updated) - Add Conditions -Set criteria that must be met before the workflow runs.
By choosing to add a condition, the workflow will only work if the condition or the number of conditions you added are met. Follow the next steps to add conditions:
- Select from the drop down the field you want to add the condition on.
- Select the condition you want to meet.
- Click on the empty field and the tooltip will pop up showing the options you can choose.
- You can populate the field in one of the following options:
- Static value – number / string. when using strings, you need to surround them with single quotes (‘).
- Property value from a previous activity (Using the tooltip that opens when clicking on the field).
- Expression – using functions and/or Previous activity properties and/or static values (Using the tooltip that opens when clicking on the field).
- You can populate the field in one of the following options:
- Repeat steps 1-3 for all the fields.
Activities #
Mark A Task As Complete #
This activity updates a task in Hibob, marking it as complete by using its unique Task ID.
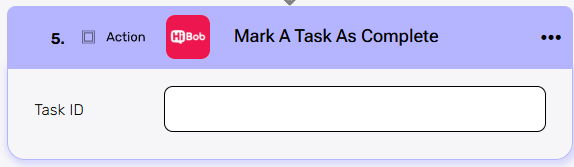
- Task ID– Enter the unique ID of the task that you want to mark as complete.
Read All Open Tasks #
This activity gets a list of all tasks that are currently active or incomplete within the Hibob system.

Read Company Employee Fields By Employee ID #
This activity retrieves specific data fields for a single employee using their backend-id.
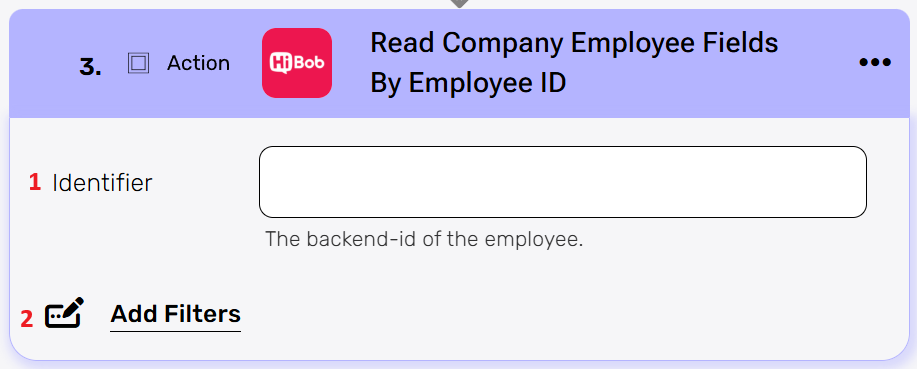
- Identifier– Provide the employee’s unique backend-id to access their company fields.
- Add Filters– The “Add Filters” button allows you to select the specific fields you want to retrieve. You can also choose the data’s format, which converts the “machine format” numeric IDs into human-readable values that are easier to understand.
- By clicking the “Add filters” button, you can choose how to fill in the various fields.
- Choose from the drop down the field you want to fill.
- Click on the empty field to be shown the tooltip with all the options you can use to fill the field.
- You can populate the field in one of the following options:
- Static value – number / string. when using strings, you need to surround them with single quotes (‘).
- Property value from a previous activity (Using the tooltip that opens when clicking on the field).
- Expression – using functions and/or Previous activity properties and/or static values (Using the tooltip that opens when clicking on the field).
- By clicking the “Add filters” button, you can choose how to fill in the various fields.
List Work History For A List Of Employees #
This activity retrieves the work history for multiple employees at once, by providing a list of their IDs.
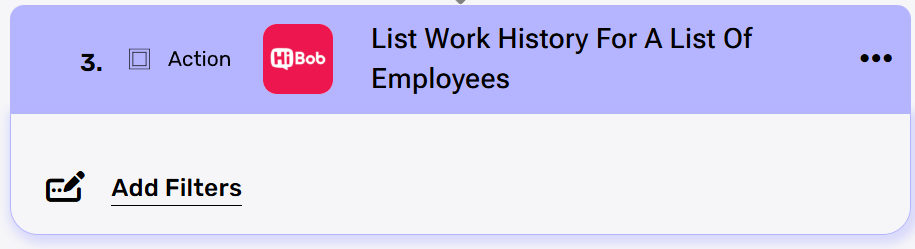
Add Filters– Clicking “Add Filters” lets you choose which parameters to use, such as Employee Id.
- Choose from the drop down the field you want to fill.
- Click on the empty field to be shown the tooltip with all the options you can use to fill the field.
- You can populate the field in one of the following options:
- Static value – number / string. when using strings, you need to surround them with single quotes (‘).
- Property value from a previous activity (Using the tooltip that opens when clicking on the field).
- Expression – using functions and/or Previous activity properties and/or static values (Using the tooltip that opens when clicking on the field).
List Employees Employment History #
This activity fetches the full employment history for a specific employee.
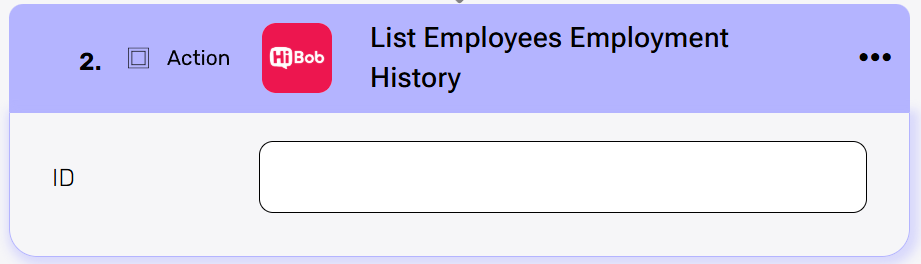
- ID– Enter the employee’s ID to retrieve their employment history.
Send Api Request #
This activity allows you to send a custom API request directly to Hibob’s API.
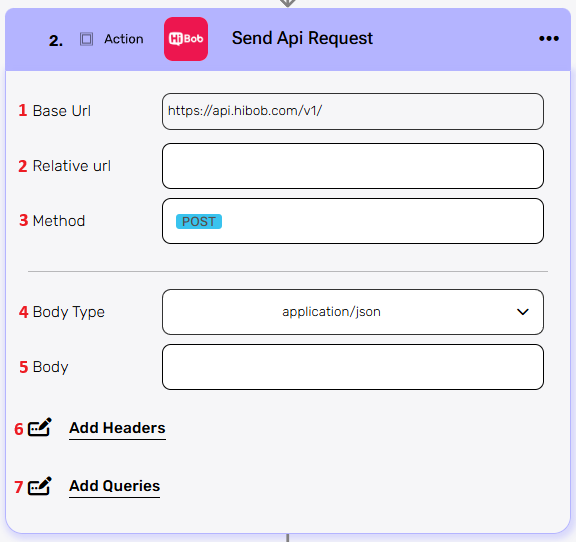
- Base Url – This is the root URL of the API you’re sending the request to.
- Relative url – You can specify additional path segments or parameters that need to be added to the end of the automatically generated URL. This allows you to customize the specific request you want to perform.
- Method – Select the HTTP method (e.g., Get, Post, Put, Delete, Patch).
- Body Type – Defines the format of the data in the body of your request. Commonly used values include application/json (as shown), which means the body will contain a JSON-formatted payload.
- Body – Contains any data that is being sent to the server.
- Add Headers – Additional metadata about the request, such as the type of data the Engini can accept, the length of the request body, and authentication information.
- Click on the “Add Headers” button to add a header.
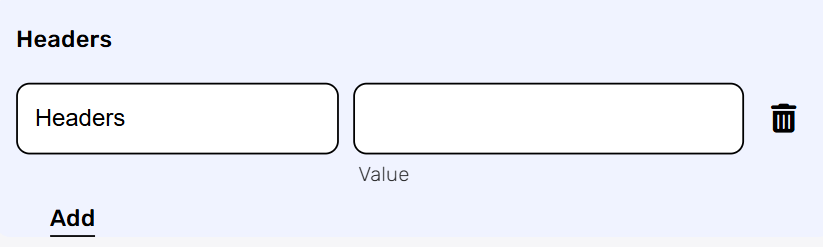
- Click on the headers field to enter the key, and on the value field to enter a value. Each header consists of a key-value pair, where the key is the name of the parameter, and the value is the data associated with that parameter.
- Click on the “Add” button to add more headers.
- Click on the “Add Headers” button to add a header.
- Add Queries – The query refers to the parameters or data that are included in the URL of an HTTP request to provide additional information or instructions to the server.
- Click on the “Add Queries” button to add a Query.
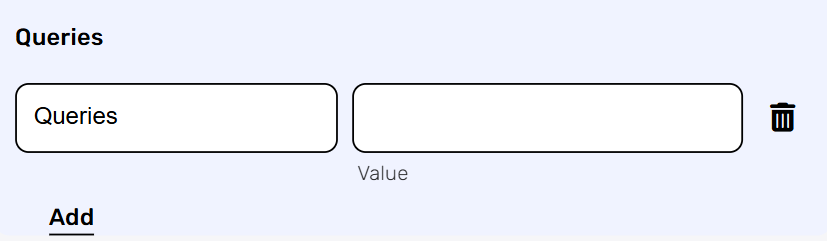
- Click on the queries field to enter the key, and on the value field to enter a value. Each query consists of a key-value pair, where the key is the name of the parameter, and the value is the data associated with that parameter.
- Click on the “Add” button to add more queries.
- Click on the “Add Queries” button to add a Query.


.png)