Engini’s tables serve as the central repository for consolidating all pertinent information and facilitating essential work processes. While the table structure is adaptable to accommodate the specific requirements of each team or organization, it consists of fundamental components, which will be elaborated upon in the documentation.
Create your table #

You can add one or more tables to the same workbook by clicking on ‘+’ and changing the name of the table from ‘New Table1’.
- Tip: give the table a significant name.

Create Columns #
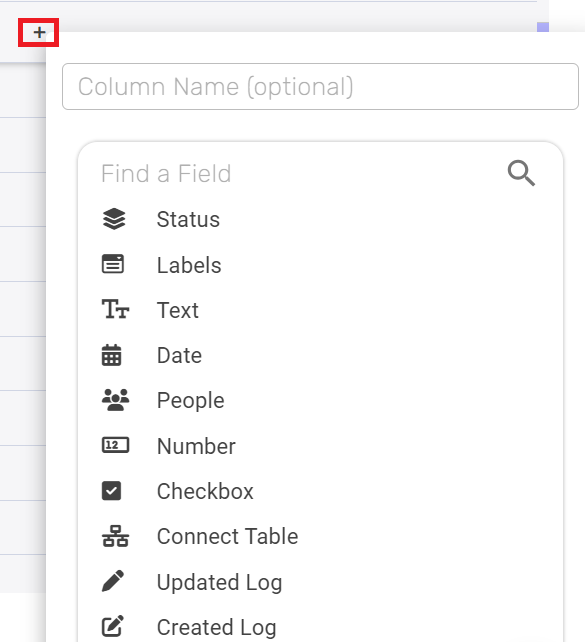
- To add Column, simply click on the + sign in the far right of the table’s column section.
- Choose the column type you want from the dropdown menu.
You will be able to view various types of columns later in the guide. - Name the column.
- Fill the rows with current data.
- In order to do actions in a specific column, open an existing column menu in the right side of the column by clicking on the three dots:

- Duplicate
You can add the same column directly to the right side. Click on ‘Duplicate’. - Delete
You can delete a column while clicking on ‘Delete’. - Filter/Sort
You can Filter / Sort the column. You will be able to learn how to sort and filter later in the guide. - You can expand the column by clicking on the right side. The width of the column will be up to 1000px.
- Change the location of the column- change it location by dragging the column to its new location.
- Duplicate
Sort & Filter #
Take your table customization up a notch with a filter. This feature lets you show off specific info in your table, tailored to your display needs.
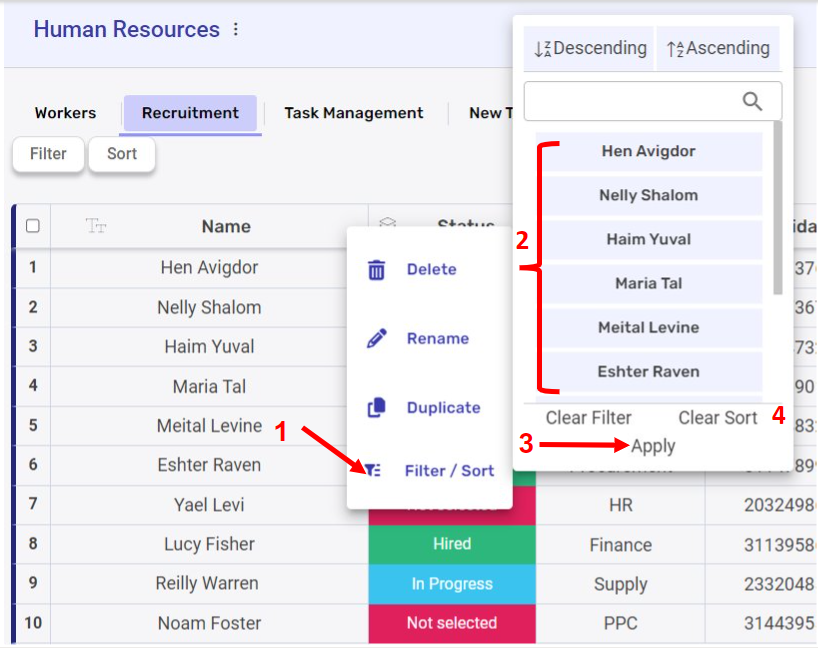
- Click on ‘Filter/Sort’.
- Choose your filter criteria, in the example choose one of the names.
- Apply your choice.
- You can clear the filter.
- You can sort a field in a table by selecting the field and choosing whether the order will be descending or ascending.
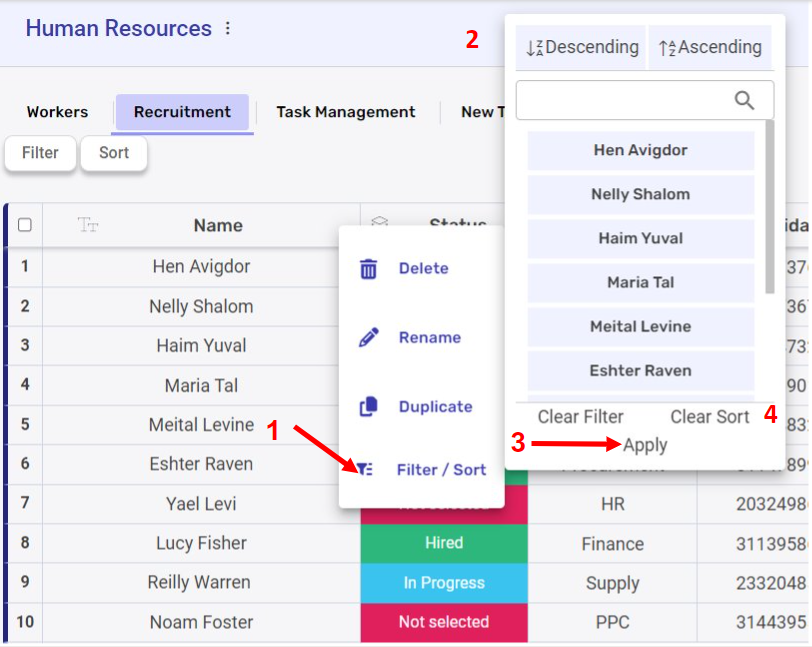
- First, click on ‘Filter/Sort,’ then choose your sort criteria and finally, click ‘Apply’.
- Choose your sort criteria (Descending / Ascending).
- Apply your choice.
- You can clear the sort.

To create a quick filter, click on the “Filter” icon on the top left side of the table:

- Click on “Add new filter”

- Choose the field from the drop down.
- Choose the condition from the drop down.
- Enter the value to compare it to.
- Click on the “save to view” button on the right side of the popup.
To create a quick sorting, click on the “Sort” icon on the top left side of the table:
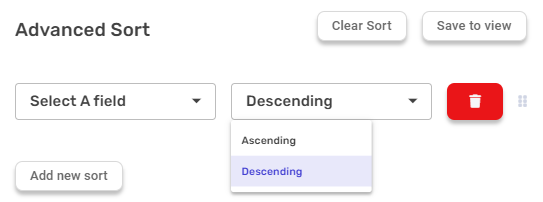
- Click on “Add new sort ”
- Select the field you want to sort from the drop down.
- Choose the sorting.
- Click on the “save to view” button on the right side of the popup.
Comments #
You can add and edit comments on any row in your table to provide additional information, share feedback, or collaborate with teammates

- Click on the comment icon.
- A new window will pop up on the right side, click on “write a comment”.
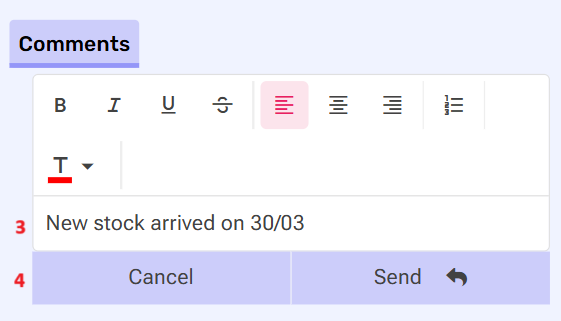
- Write your comment and use the toolbar to bold, italicize, underline, or align your text in order to make your message clear and easy to follow before hitting “Send”.
- Choose to sent / cancel the comment
- Once you send the comment, the row will show that it has one comment. You or your colleagues can then reply to it by clicking the “Replay” button, and the number of comments will increase accordingly.

- Once you cancel the comment, it won’t appear and the comment count will remain unchanged.
- When you click the three dots on the right, a window opens with three options.

- Reply
When you click on ‘Reply’, a text box opens for you to write a response.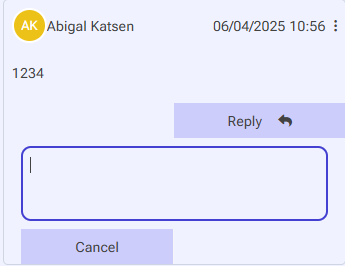
After you click ‘Reply’, you have the option to respond directly to the person’s comment (to click ‘Reply …’) or simply add another comment.
- Delete
When you click ‘Delete’, it removes the comment you wrote. - Edit
When you click ‘Edit’, you can modify the content of the comment after it has been sent.
- Reply
- Once you send the comment, the row will show that it has one comment. You or your colleagues can then reply to it by clicking the “Replay” button, and the number of comments will increase accordingly.
Views & Hide #
Enhance your data presentation by altering the view of the original table or creating an additional view. We let you filter various column types, like status, labels, text, people, numbers, and more. This approach gives you a new outlook on your data, leading to improved data readability and a better understanding of the most important info you need right now.
- If you choose to filter one or more columns within the original table:
- Click on ‘Hide’ on the top of the table.
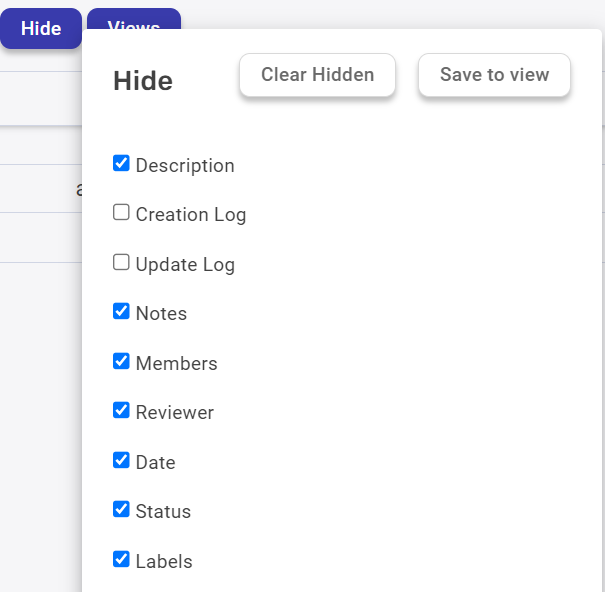
- Choose the columns you want to filter by removing the selected option in the check box.
- Click on ‘Save to view’.
- Click on ‘Hide’ on the top of the table.
- If you choose to filter one or more columns within a new view of table:
- Click on Views on the top of the table.
- Click on ‘Add new view’.

- Name the new view.
- Repeat the steps from Stage 1.
Note: Ensure you’re in the correct view by clicking ‘Views’ to access all your views.
Types of Columns #
Status #
The status column is a key factor in planning, organizing and tracking all of your team’s work. The status allows you to easily see the status of the tasks.
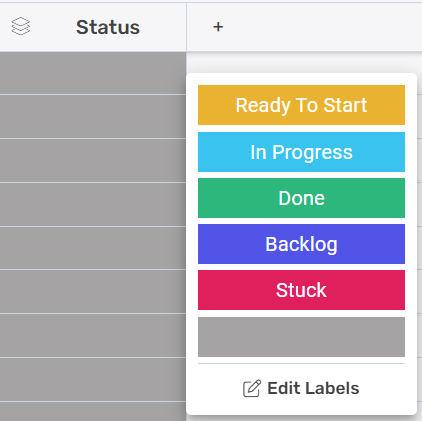
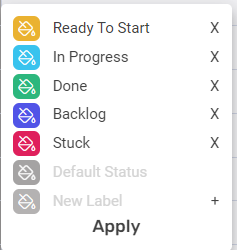
You can edit the status labels according to your workflow. To do this:
- Click on one of the Status columns cells.
- Click the Edit Labels button at the bottom to modify the labels.
- Alter the displayed text to your preference.
- You can add more labels:
- Write a new status in ‘New Label’
- Click on ‘+’
- To select a color, click on the desired option.
- Click on ‘New Label’.
- Click on ‘Apply’.
Note: The gray label is the default label that appears when an item is created. We recommend leaving the gray status label blank because setting a status to the gray label can cause confusion for users.
Tip: Use automation to streamline your workflow! You can effortlessly set up automations to update your team when a status changes, for example. You can learn more in this guide.
Labels #
serve to categorize and organize items.
Text #
This column allows you to add any type of text such as names, short comments, phone number, address and more.
Date #
The date column allows you to set dates for your tasks, such as dates the items were created or due dates. The default option is date only but you can choose to display the date with or without the time.
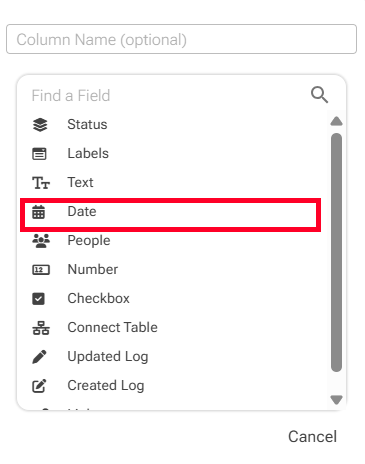
Choose the Date column to store the calendar date.
You have 2 options: 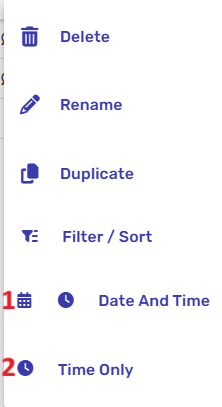
- Choose Date And Time to store both the calendar date and the exact time.
If you clicked it by mistake, don’t worry! You’ll still have the option to use only the date or only the time, depending on what you need. - Choose Time Only to store the exact time. If you clicked it by mistake,no problem! Just click the three dots and switch to Date Only or Date and Time, depending on what you need.
People #
The People column allows you to assign tasks to one or multiple users. This column type provides a visual representation of who is responsible for which tasks and gives ownership of tasks to your team.
Number #
You can use this column for anything related to a number: counter, budget, quantity of item, number of hours you spent on a task and more.
Checkbox #
Represents a binary choice according to conditions and settings. It can be checked or unchecked (empty).
Connect Table #
The Connect tables Column allows you to easily link one or more tables to the current one that you are on.
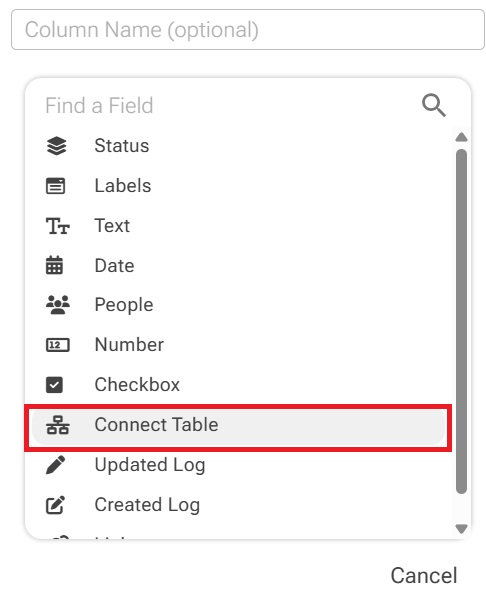
1. Choose the table you want to connect to by searching for it in the search box, or select it from the list.

2. Select the field you want to display from the connected table you chose. You can either search for it using the search box or click directly on the field.

3. Allow linking to multiple records
Select this if you want to link multiple values from the selected field in your table record.
4. Create bidirectional field
Create a two-way connection between items in both tables. Any item linked from one table will automatically appear as a linked item in the other table as well.

This helps ensure that only relevant or identifying information is shown when viewing linked items.
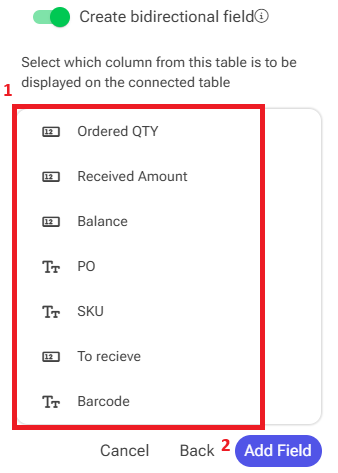
- Choose which column from the current table will be displayed in the connected table.

- Add field
Click on the Add Field button to confirm.
Note: Connected Table fields display relationships between records. When updating or creating records in workflows, always use the Record ID – Connected Table fields cannot be used to identify the record.
5. Filters #
Filters allow you to control which records from the connected table will be displayed in the current table. After linking the table, you can set filter conditions to display only the records that meet those criteria.
1. Click “Add Field” to open the filter screen.
If you don’t need to apply any filters, just click OK to proceed.

2. Add conditions to control which records from the field you chose will be available.

- Click on the left field and choose the field you want to filter by from the table you connected to.
- Select the condition you want the record to meet from the conditions list.
- Click on the rightest field and the tooltip will pop up showing the options you can choose.
You can populate the field in one of the following options:- Static value – number / string. when using strings, you need to surround them with single quotes (‘).
- Property value from a previous activity (Using the tooltip that opens when clicking on the field).
- Expression – using functions and/or Previous activity properties and/or static values (Using the tooltip that opens when clicking on the field).
Created Log #
Adds the creator of the record and the date and time it was created.
Updated Log #
Here, you can see who updated the record and the date and time it was updated.
Link #
The Link Column allows you to add an hyperlink to any website. You have the flexibility to customize each item with a particular web address and the corresponding text to be displayed.
Files #
The Files column allows users to attach, preview, and manage files directly within a record. It’s designed to centralize documents such as reports, images, or contracts, keeping all relevant materials in context.

Supported Actions #
- Upload single or multiple files via file picker (web & mobile)
- Preview supported types (e.g., PDF, JPG)
- Delete files (single or multi-file mode)
- Workflow integration – usable in workflow automations (upload, delete, etc.).
Supported File Types #
- Documents: doc, docx, xls, xlsx, ppt, pptx, pdf, txt, csv, json, html, htm, xml.
- Images: jpg, jpeg, png, webp, gif, svg, bmp.
- Videos: mp4, webm, mov, wmv, avi.
- Audio: mp3, aac, wav, ogg.
- Archives: zip, tar, 7z, rar.
File Type Restrictions: Admin-Level vs Column-Level #

The platform supports file type restrictions at two levels:
Admin-Level Restrictions
Administrators can define a global allowlist of permitted file types across the entire account. Any file type not allowed at the Admin level will be blocked globally – it cannot be uploaded to any Files column, regardless of the column’s individual settings.
Column-Level Restrictions
Each Files column can further restrict file types on top of the Admin-level allowlist.Columns can narrow down the list of allowed file types, but cannot override the Admin restrictions.
- In other words:
➤ Allowed in Admin + Allowed in Column = Upload possible
➤ Not allowed in Admin = Upload blocked, even if allowed in column
This layered control ensures that only explicitly approved file types are accepted, both at the admin and column level.
To allow file types follow the next steps:
- Click the three dots next to the column name
- Click on “Allowed File Types”
- Choose the file types you want to allow
- Don’t forget to Save.
File Storage Limits #
The Files column enforces storage limits to ensure performance and compliance with user or system-level quotas.
Per-File Size Limit
Each uploaded file must not exceed the maximum allowed size per file, as defined by the system or user-level policy. Files that exceed this limit will be blocked, with a clear error message indicating the allowed size.
Account-Level Storage Quota
Each user or workspace may have an overall storage quota.
- If this quota is exceeded, no new files can be uploaded until storage is freed or increased.
- Uploads blocked for this reason will include an error message explaining that the account has reached its storage capacity.


.png)