This guide will walk you through the smooth setup process, enabling efficient invoice management by automatically capturing an email attachment in Outlook, extracting its data using Claude of Anthropic connection, and inserting the details as a new transaction invoice record into the Priority database.
Prerequisites #
Before you begin, ensure the following connections are established:
- Connection between Engini and Priority.
Learn how to connect priority to Engini - Connection between Engini and Outlook.
Learn how to connect outlook to Engini. - Connection between Engini and Anthropic Claude.
Learn how to connect Anthropic to Engini.
Create a new Workflow #
To learn how to create a workbook, click on Workflows.
Add a Check for New Emails Trigger #
To get started, add Check for new emails trigger activity of Outlook.

- Choose the connection of your Outlook account.
- Set the Starting (UTC) date and time. This defines when the workflow should begin checking for emails.
- Choose how often the workflow should run by setting the Recur every fields (e.g., set to 30 Minute).
- Configure Filters:
To ensure the workflow only triggers on emails that contain an invoice attachment, you must configure the following filters: - Repeat on step 5 to Add more conditions in addition to the status condition if necessary.
You can populate the value field in one of the following options:- Static value – number / string. when using strings, you need to surround them with single quotes (‘).
- Expression – using functions and/or Previous activity properties and/or static values (Using the tooltip that opens when clicking on the field).
Sort & Filter #
Now we want to filter the emails located in Outlook, that are sent from the specific client. Choose Sort & Filter action of Engini into your workflow.
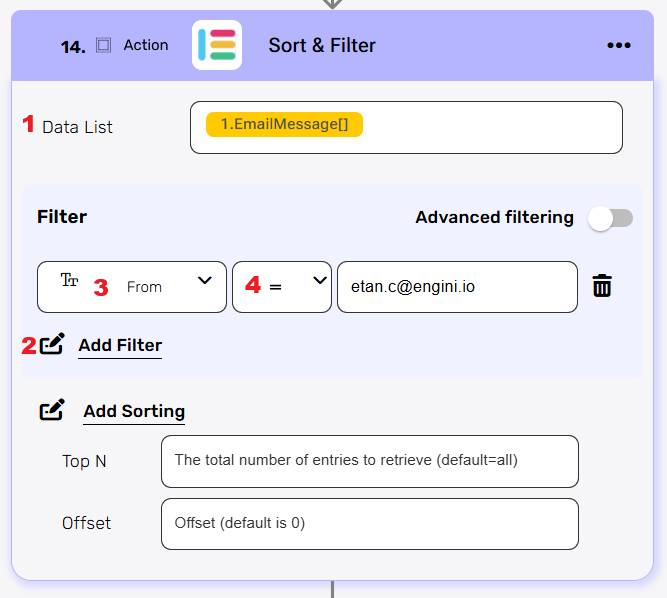
- Data list – Add dynamically the data base representing the list of emails from the previous Outlook Trigger into the Data List input field.
- Choose Add Filter in the Filter section.
- Select the field to filter by, which is From.
- Select the comparator, which in this case is equals.
- Enter the specific email address of the client/vendor you want to process.
Initialize Variable #
We want to initiazlie a variable to store the data extracted from the Create Messages activity response, this will be useful for later purpose. Choose Initialize Variable action of Engini into your workflow.
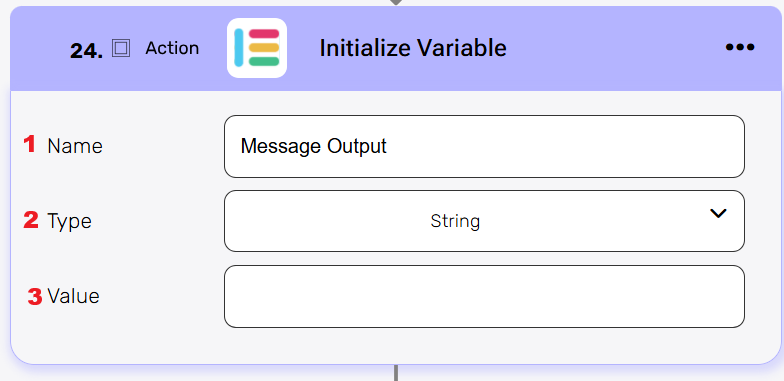
- Name – give your variable a name (e.g., Message Output).
- Type – choose in the dropdown options for type the String Type, the message output will be in form of a text.
- Value – leave it empty.
For Each Loop #
Now that we have filtered the list to include only the relevant emails, we must iterate through them one by one to process the attachment and extract the invoice data. Choose the For Each Loop action of Engini and insert it into your workflow.
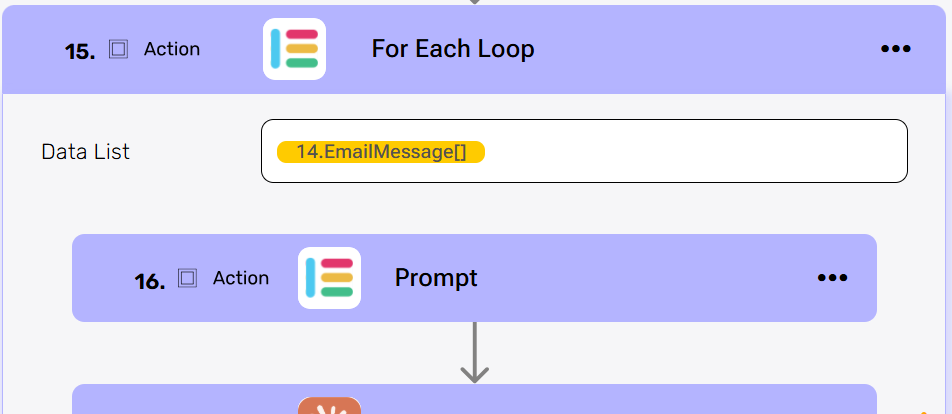
Add dynamically the data output from the previous Sort & Filter step into the Data List input field.
Compose String #
The Compose String action is used here to define the exact instructions (the Prompt) for the OCR/AI service (Claude) on what to extract from the invoice attachment.
Choose the Compose String action of Engini and insert it as the first step inside the For Each Loop.
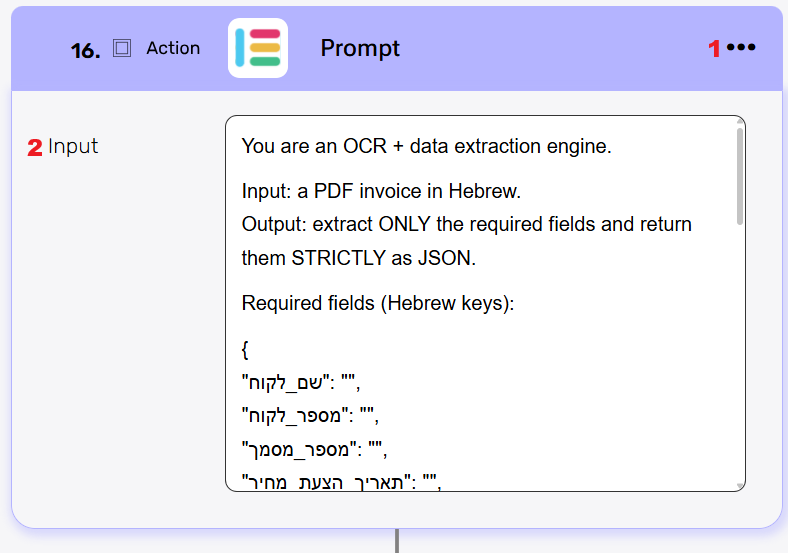
- Optional – Click the action title (or the three dots menu) and rename the block from compose string to Prompt to better reflect its function in defining the AI task.
- In the Input field, paste the detailed instructions (the Prompt) for the OCR/AI engine.
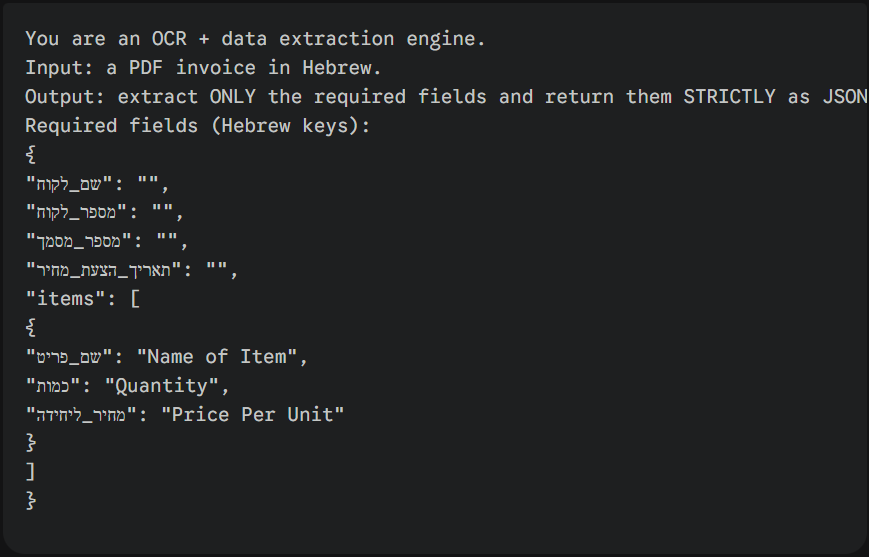
Example of Input Field Content:
The content below defines the AI’s role and mandates the extraction of required fields into a strict JSON format using the specified Hebrew keys:
Build the Create a Message Structure #
Add an object array variable to define the structure (schema) for the temporary array that will hold the extracted invoice data.
Choose the Initialize Object Array action of Anthropic Claude and insert it into your workflow.
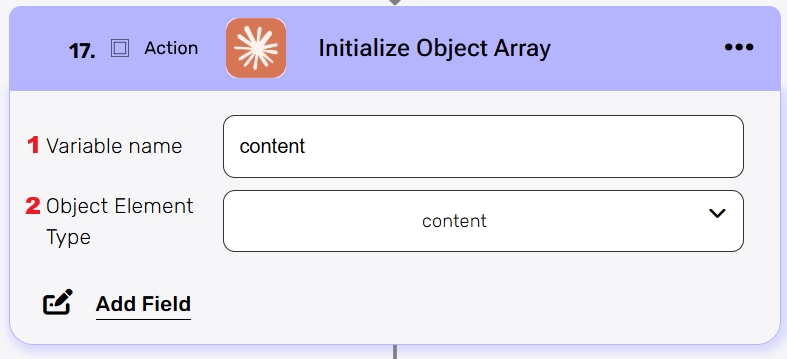
- In the Variable name field, enter “content”. This is the name you will use to reference this temporary array later in the workflow.
- Select content as the Object Element Type field. This defines the structure of each item within the array.
Note: You can perform the Append to Object Variable step directly inside Initialize Object Array using Add Field– fewer actions, faster flow. this is for one object.
In this example we choose to show you the append activity too.
Add an Append to Object Array action of Anthropic Claude to take the attachment content from the filtered email and append it to the content array. This prepares the file data to be sent to the OCR for extraction.
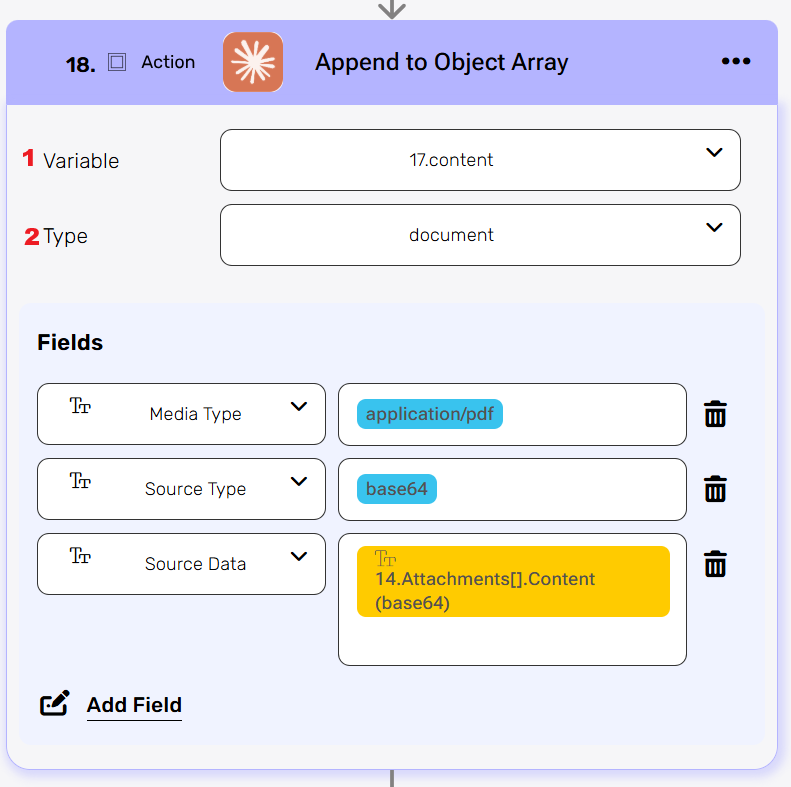
- Variable – select the array variable you initialized in the previous step (e.g., content).
- Type – select the “document” type.
- Click Add Field and define the following three crucial fields for sending the file content:
- Media Type: Set the field name to Media Type and the value application/json (as the invoice is expected to be a PDF).
- Source Type: Set the field name to Source Type and the value to base64 (as this is the required encoding for the OCR).
- Source Data: Set the field name to Source Data. Dynamically choose the data base representing the attachment content from the Outlook step into the value field (e.g., 14.Attachments[].Content(base64))
Add an Append to Object Array action of Anthropic Claude to define the text instructions that accompany the PDF file sent for processing.
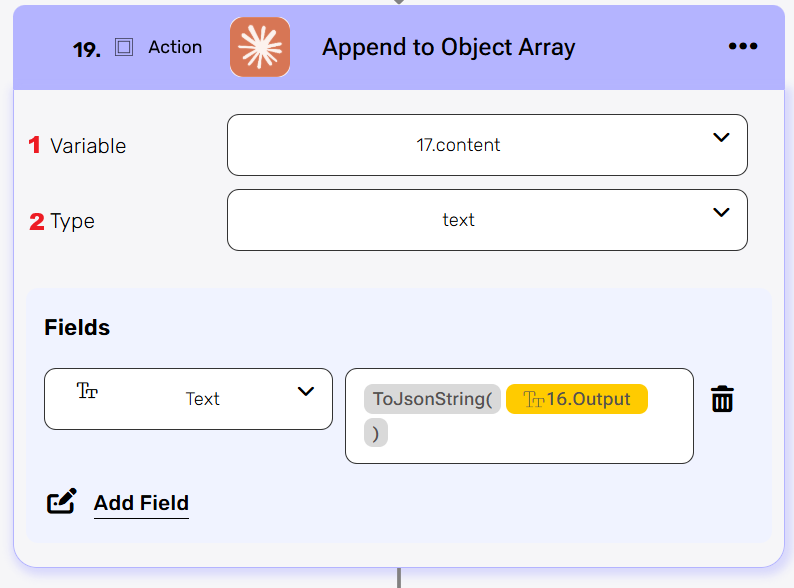
- Variable – select the array variable you initialized in the previous step (e.g., content).
- Type – select the “text” type.
- Click Add Field and define the field to hold the instructions:
- Set the field name to Text.
- Use the Engini function ToJsonString() wrapped around the output of the Prompt step. Dynamically choose the output of the compose string (“prompt”).
Add an Initialize Object Array action to create the array that will hold the final structured request payload for the OCR service.
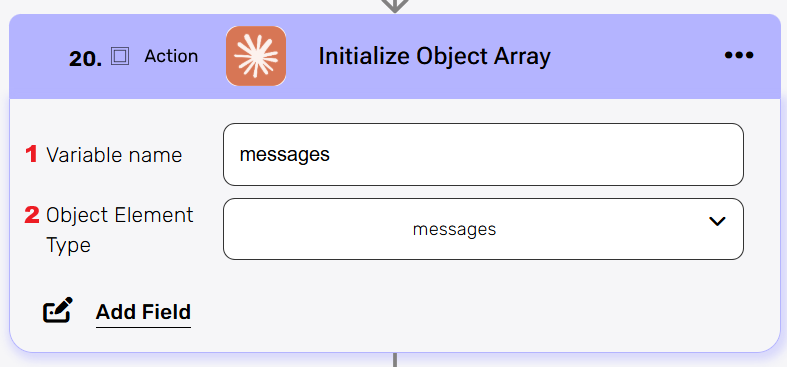
- In the Variable name field, enter “messages”.
- Set the Object Element Type to “messages”.
Add an Append to Object Array action of Anthropic Claude to define he complete message payload that will be sent to the OCR engine.
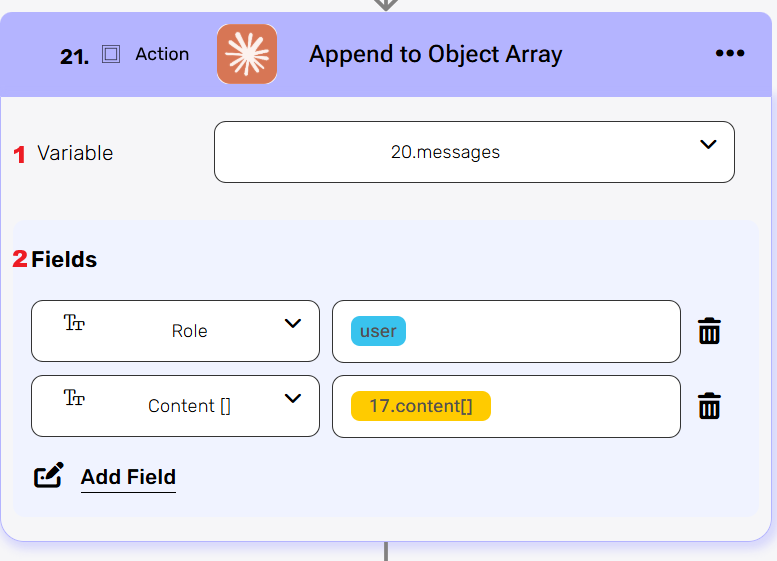
- Variable – select the array variable you initialized in the previous step (e.g., messages).
- Click Add Field twice to configure the two required elements of the message:
- Role: Set the first field name to Role and the value to user.
- Content: Set the second field name to Contents[] and map the object array variable that we created for content in the previous steps.
This is the final action that sends the structured request (the file and the instructions) to the Claude OCR engine for data extraction and receives the structured JSON output. Choose the Create Messages action of Anthropic Claude and insert it into your workflow.
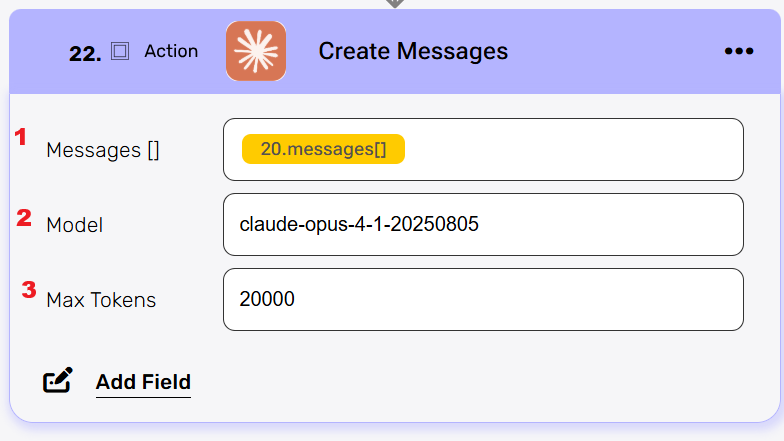
- Set the Messages[] field to the object array initialized in the previous step named messages.
- In the Model field, select or enter the specific Anthropic Claude model optimized for complex document understanding and JSON output. We recommend using the latest high-performance model:
- Suggested Model: claude -3-opus-20240229(or the specific version you are licensed for).
- In the Max Tokens field, insert the maximum length allowed for the response from the OCR service (not including the input size).
- Explanation: This value determines how long the resulting JSON output can be. Since you are expecting a structured list of line items, ensure this value is high enough. A typical starting recommendation is 20000 ,which is generally sufficient for detailed JSON extraction.
Set Variable #
Stay in the same For Each Loop, and now add the Set Variable action to it. We want to update the value inside of the variable we created before the loop.
Choose Set Variable action of Engini into your workflow.
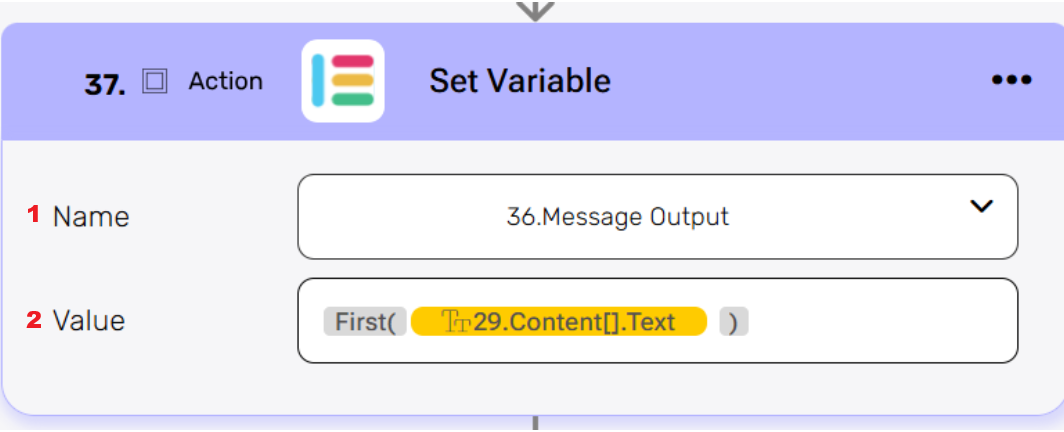
- Name- in the dropdown options choose the name of the variable you named before (e.g., Message Output).
- Value – choose the Engini function First () and wraaped it around the content.text. You can find it dynamically inside the Create Messages ->Content [] -> Text.
Invoice Object #
After the Create Message request returns its response, the output often contains extra text or characters outside the main JSON object. This step uses Engini’s functions to isolate the clean JSON for easy mapping in later steps.
Choose the Initialize Variable action of Engini and insert it into your workflow.

- Click the action title and rename it to invoice Object for clarity.
- Name – Invoice Object.
- Type – choose Object.
- In the Value field, insert the following formula to locate and extract only the valid JSON string:
- Slice () – Extracts the clean string between those two points, ensuring only the valid JSON data is saved as the Invoice Object
- IndexOf () – Finds the position where the JSON object officially begins.
- LastIndexOf – Finds the position where the JSON object ends.
Parse JSON/XML #
The data saved in the previous step (invoice Object) is currently a text string. This step converts that string into a native object structure so Engini can access individual fields (like “Invoice Date” or “Total Amount”) using data pills.
Choose the Parse JSON / XML action of Engini and insert it into your workflow.
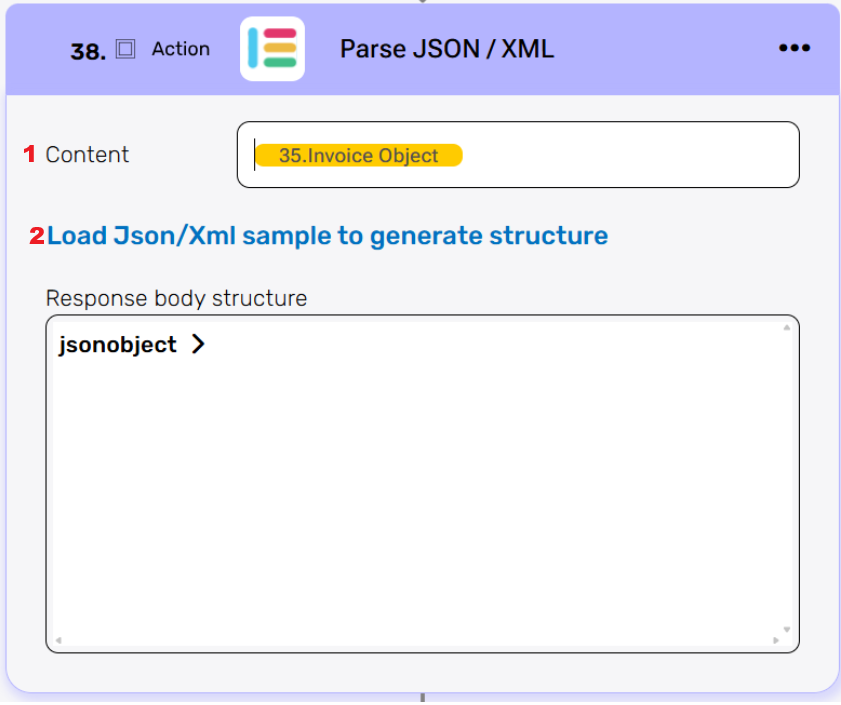
- Content – dynamically map the output variable from the previous step (e.g., Invoice Object).
- Click Load Json/Xml sample to generate structure.
- Paste a sample of the exact JSON structure that you defined in the Prompt step.
- Engini will analyze the sample and display the output structure in the Response body structure panel. This makes the individual fields available for mapping to Priority in the final steps.
Create in Priority #
This is the final step where the extracted and structured invoice data is inserted directly into Priority, completing the automation workflow.
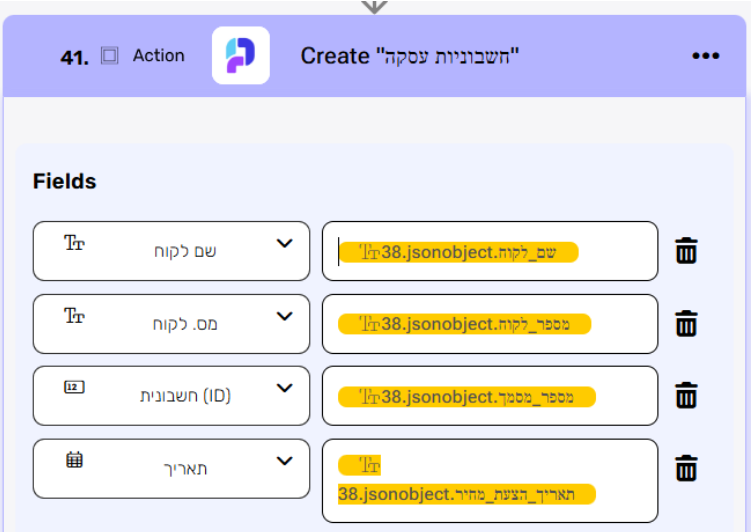
- Choose the Create action of your Priority Connection and insert it into your workflow.
- Select the appropriate Priority ERP form or table where the invoice record should be created (e.g., “חשבונית עסקה” / “Transaction Invoices” or the relevant Purchase Invoice form).
- Click Add Field to map the data from the Messages output to the necessary Priority fields. The structure is always:
Priority Field Name –> Value from jsonobject.


.png)